
Open Pit Grade Control Program for OP Mining Geology
All the work conducted for unearthing the ore body during the open pit operation; “collecting the data, locating the ore in detail, spotting the ore body to excavate in the cleanest way possible, and stock it until feeding crusher“, can be described as “grade control program“. The grade control program in the open pit operations are carried out by the mining geology department, with the results obtained and processed, team spots the ROM ore body and guides excavation operators in the mine and ensures production and classification. The mine geology department “the team” consists of geologists, foremen, drillers and samplers / spotters.
After the drilling, your exploration project has been modeled and evolved as an operation, everything is quite good, you are sure that the “ore body” is there. “0” kilometers, you rolled up your sleeves with the appetite to catch the ore body from one end and excavate efficiently at the beginning of each operation, you are ready for a clean mine! I think this is where the “experienced” geologists and miners started to get sour. Yes, no one could have foreseen such problems, nature has confronted you to teach you another lesson and is waiting for you to make the most rational move.
In projects where production planning has been made based on the ore model or certain assumptions, the team needs to separate ore and waste in the most accurate way while the excavation process continues. In this regard, the excavation (mine operation) team needs guidance from mining geologists. Amidst the mining team’s non-stop excavation work, the mine geology department needs more than drilling data and modeling to quickly and accurately identify ore and realize production. With the grade control program, many tasks such as mapping, sampling and modeling must be integrated into the ongoing process with a system, and the ore must be excavated cleanly and stocked. In addition, it is important to instantly monitor the tonnage and grade ratios of the ore waiting to be fed to the facility (or being sold as raw). In order to do these within the determined periods between ongoing operating activities, geologists and samplers must perform them in harmony and without any errors.
The geologist who will lead the grade control must know his team well, know the responsibilities of all his/her teammates, and when the time comes, people must take over the business with self-control. No matter what position you are in in the grade control operation, you will be tested by “time, negligence, physical fatigue”. You must deal with these and represent the whole team in the best way possible.
Additionally, you can explore the related articles listed below.
Why are Grade Control Program and Level Map Necessary in Open Pit Operations?
Unfortunately, the laws of mining are written with failures, and similarly, ore losses can be prevented after corrections are made by learning from negative experiences. There are many issues to consider, let’s proceed one by one.
- If you work with commodities such as gold (Au), silver (Ag), copper (Cu) and many similar metals, whose grade values are too low (around ppm) to be determined visually,
- If you need to know the average grade in terms of the process while hauling the material you have stocked to feed process plant or sell to anywhere, or if you want to send the material at the desired grade,
- If the grade results coming out of process plant and the grade you feed into the process do not match, or if you have doubts, or if you are experiencing consistency problems in the grade of run-of-mine (ROM) ore you sell.
If your ore body structure is complex enough to recommend grade control action while modeling your ore (by a specialist),
If you want to work on a budget and in a corporate manner or if your company is offered publicly,
Important: Businesses will naturally want to start production from high grade zones in order to obtain the highest income from the beginning. In addition, it will aim for this to be sustainable so that it is a salve for the deficit caused by investment startup expenses. If you do not want to have a problem, you can start by developing a healthy grade control process.
Do not rely on “only” the model created by analysis and interpretation of 8-10 cm diameter cylindrical rock samples with variable spacing and go into production directly. Someone should follow this process.
In open pit mines, the excavation plan is made at the beginning and, unless there are unusual circumstances, the master plan cannot be changed during production. Therefore, if you are having problems determining the ore body or grade during the ongoing excavation process, do not waste time to call someone who knows what to do.
If any of these items seem familiar to you, let’s examine how to make level mapping and grade control program for open pit production.
Fundamentals
Grade control program is implemented through different processes in underground and open pit mines. In this article, we will cover the open pit grade control program. You should determine and optimize your grade control program from the beginning according to the type of mineralization, the position of your ore body and the grade distribution in the ore. Although the information you will gain from this article will give you ideas and inspiration, do not decide on your grade control program without getting an expert opinion.
Choosing a grade control program suitable for your mineralization and developing a process requires serious experience. First of all, you should know your mineralization type as much as geology allows. You should evaluate the results you have obtained in your project carefully and “learn” from the problems you have previously experienced in ore production. Ore geometry and the positioning of the ore will determine the method you will choose in the grade control program. Because the method you choose will already bring a workload, this workload and the detail to be obtained should not be more or less than necessary. Regardless of which method or methods you will use, the level mapping step must definitely be done. In grade control work, you can use one or more of three different methods at the same time: channel (line) sampling, stock area/stockpile sampling, and blast hole sampling. The methods to be used at a minimum level are given in the table below with abbreviations.

Organizing meetings with experienced experts before commencing production will be beneficial for the health of the entire process. You must have reached a certain level with your ongoing work in your business, however, it may be useful to consult an expert to evaluate the possibility of increasing efficiency a little more. You should keep a count of sample quantity per ton at periodic intervals (annually, monthly, weekly). Compare the data obtained from tonnage and grade you feed or sell with the final product. In order to have a basic understanding of where you did right and where you went wrong, evaluate the grades per ton and the comparison result together. If the consistency result from this evaluation is high, the grade control program you have decided on is the one you should have.
By examining the procedure step by step, we will go through the most difficult example, which requires more care than others, and the grade control procedure with “line sampling”. By taking this example as a draft, it will be easier for you to design the grade control program you will use in other types of mineralization.
Grade Control Procedure and Level (Floor/Ground) Mapping in Open Pit
Since the tonnage extracted per unit time in open pit mining is high, the human resources and the amount of work that needs to be done are also larger. As the mine excavation department completes ore production at the operating elevation, it will provide a permanent organization based on the production budgets for the opened area (cleared out its production) and its surroundings. Almost all personnel within the mine excavation team (Open pit mining team) and the mining geology team, which are the main actors in the operation, have many types and layers of communication with each other. Because everyone will aim to complete their assigned responsibilities as soon as possible, paving the way for their friends who will take the next step as soon as possible. This is a team work and correct communication and harmony are required for this work to flow smoothly.
By the way an unrelated topic, starting the training of your exploration and resource geologists in open pits will be a unique start for them, and will be very useful for inverstors and directors too.

1. Cold Start by Summarizing Ore Production
We need to briefly touch upon production excavation and orientation, which is a process directly related to the outcome of our topic. We carry out the production excavation on the same lines according to the “ore mark up” and maps we obtained from the results of the open pit grade control program.
After blasting, we start from the hanging wall within the level plan boundaries, continue the excavation at standard width and parallel to the lines, and haul the ore on the excavation slices to the relevant areas in the stocks and the waste into waste piles.

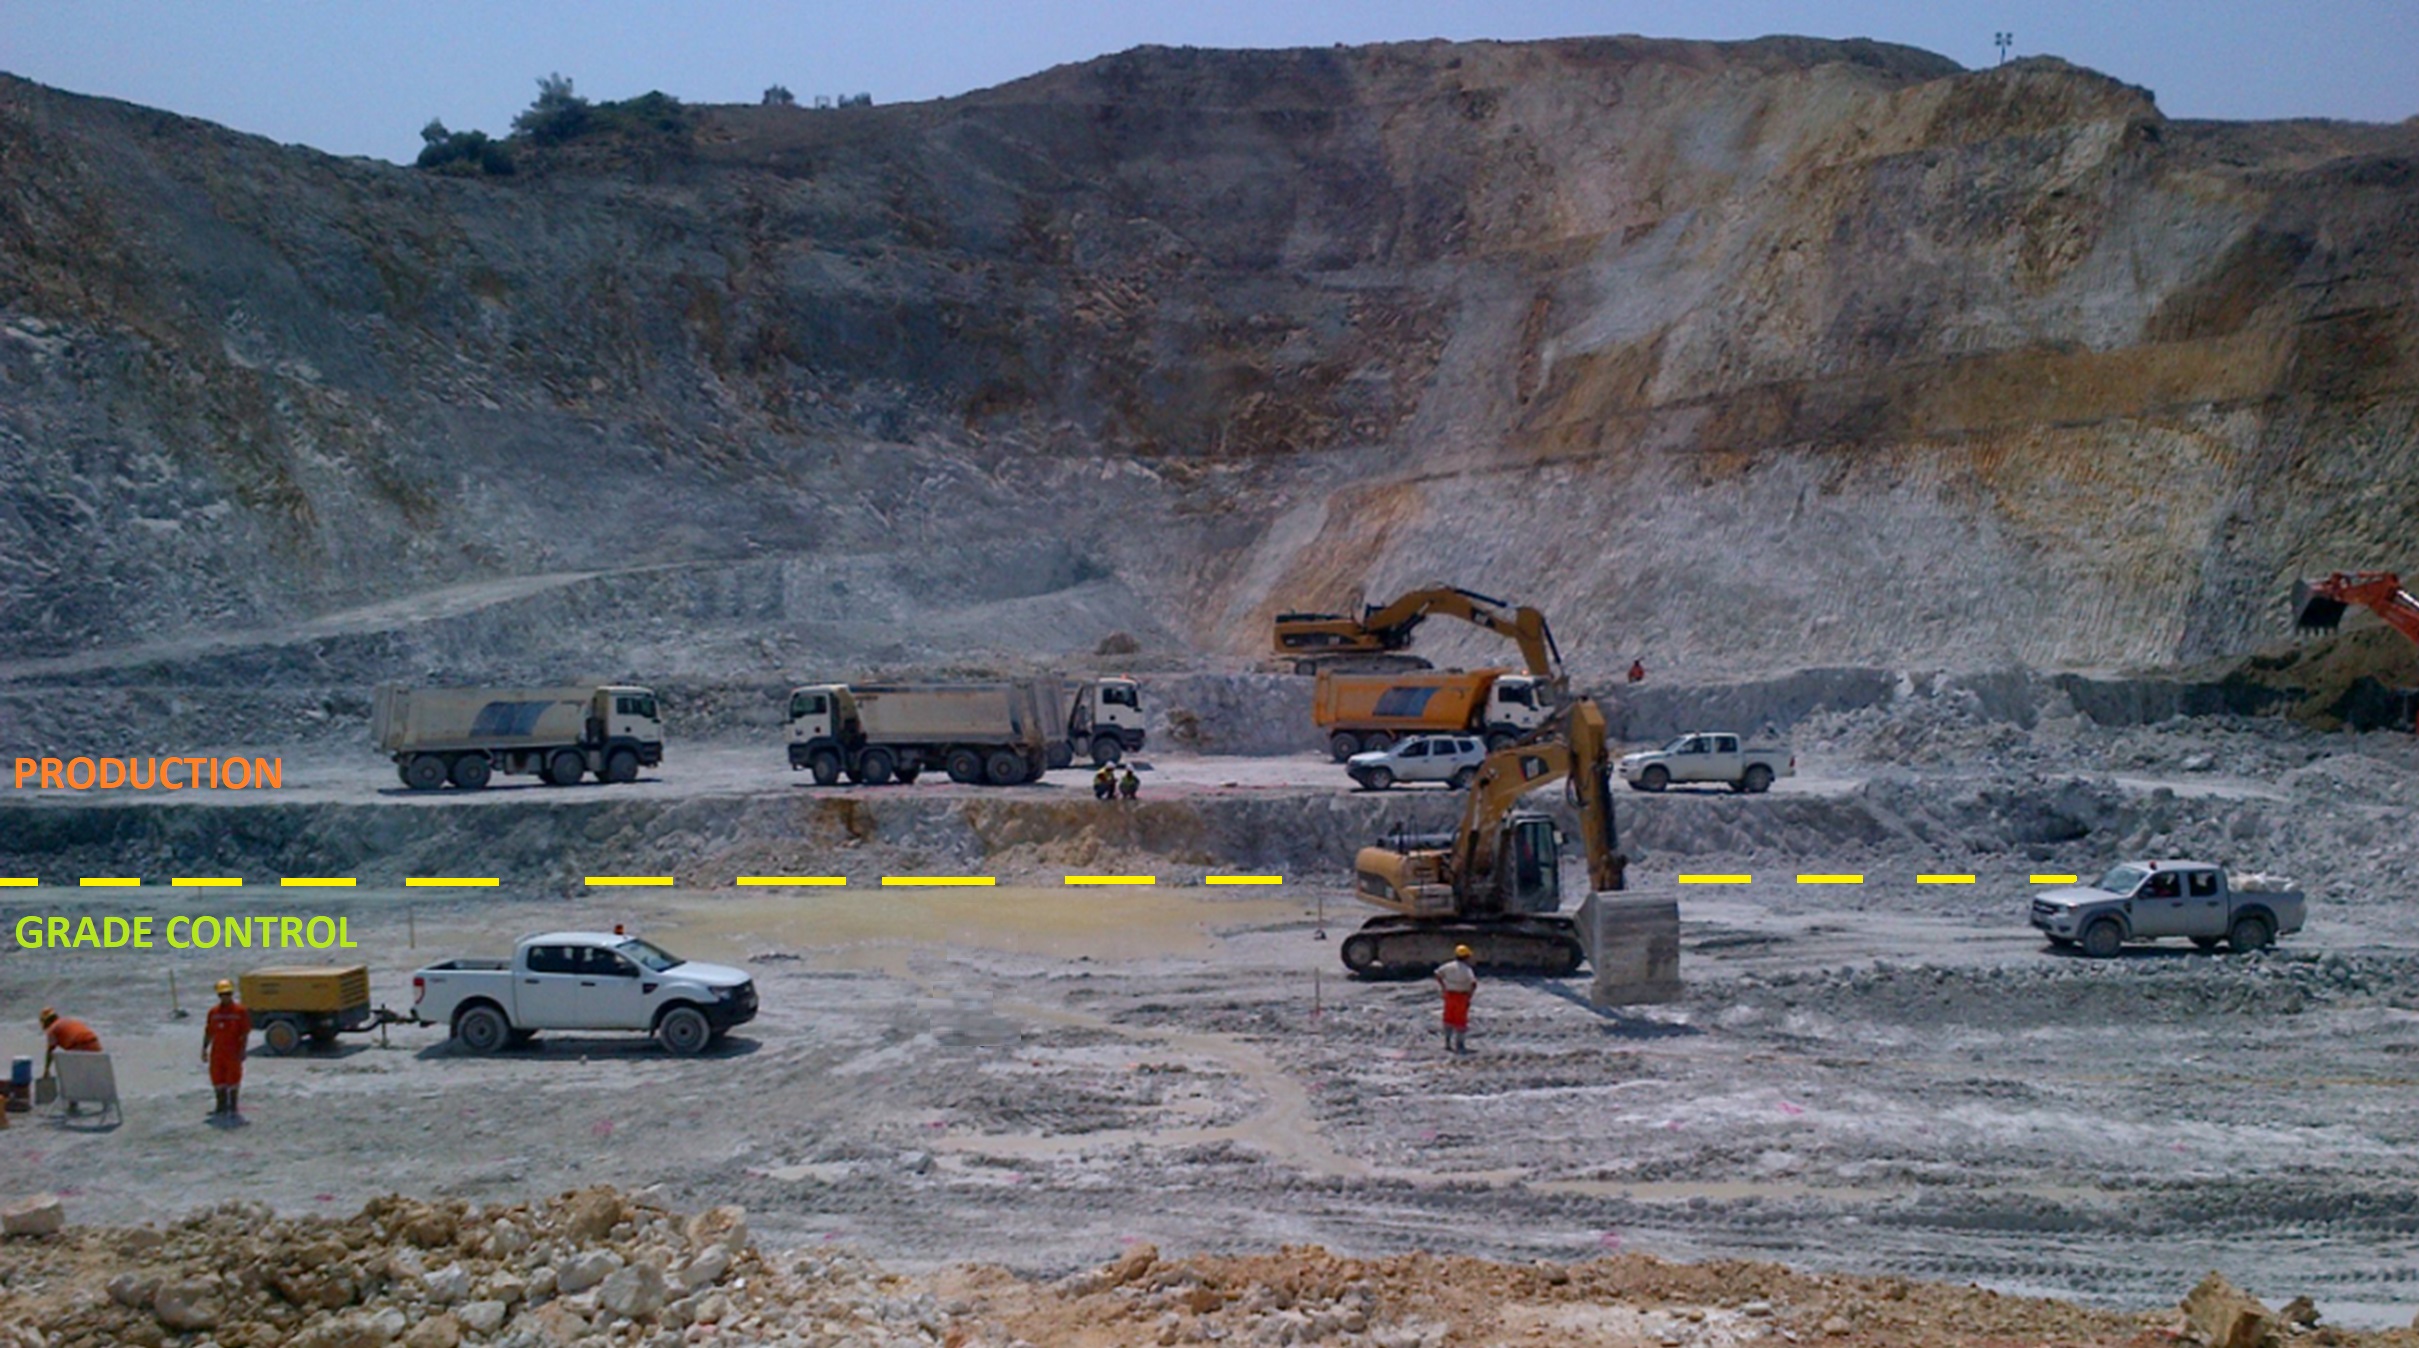
The width of the horizontal excavation slices is generally chosen as 5m (2.5m+2.5m) so that the excavator can sit comfortably or divide each line into two. A production level (floor) is completed at every 2.5 meter elevation and the ore is marked up again. Since we will carry out these “ore mark up”s according to grade control, where the grade control work are completed every 5 meters of elevation.
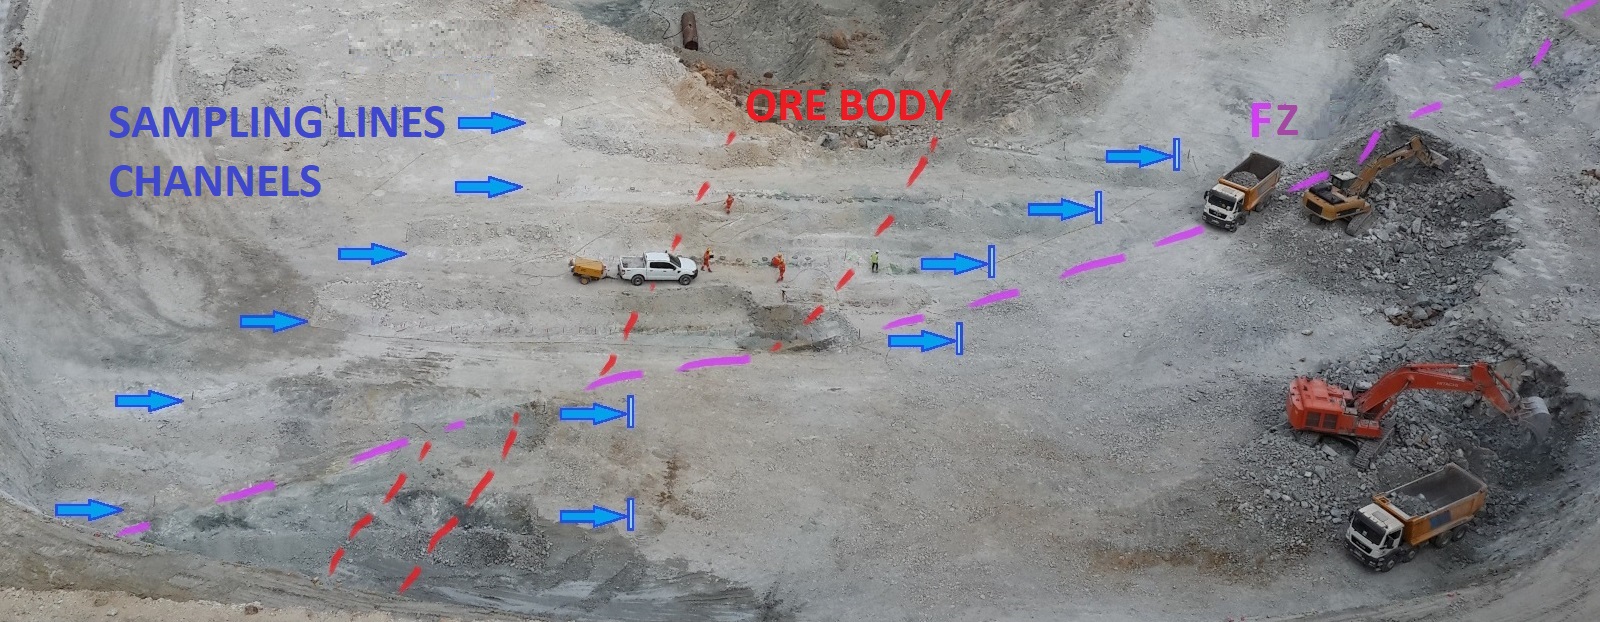
While all these processes continue at the same time, working efficiency is taken into account and they are carried out simultaneously at different elevations. In the beginning, you can determine periodic level and slice dimensions according to the grade distribution of your mineralization, the machines you will use in the operation, and your operating plan. In open pit, waste and production excavation continues in different lines in continuous circulation, often on more than one floor. While this process continues, at the same time, as the completed lines become ready, the open pit grade control program is put into operation. Each production or grade control line is named by its common “x” or “y” coordinate on the axis selected as the line direction. You must ensure communication with all personnel in production through these line names.
2. Making a Work Plan, Casting the Staff
You must always be aware of the open pit agenda, both through the communication between the supervisors of open pit excavation and the mine geology department, the “production records” of your samplers (Spotter) who carry out/direct the production, and the intraday meetings you hold. Based on the completed lines (production line/slice) and the organization of the open pit mining team, the mine geology department should always be ready upon notification of the excavation team supervisor. As we mentioned, since everyone will be informed about the status of the pit and each other throughout the process, you will be able to predict when the field will be vacant in advance. As the mine geology department supervisor, you should decide how many grade control lines you will complete in a short meeting with the open pit excavation supervisor. You should obtain information about the actual status of pit from your department’s foreman (Foreman) or samplers (Sampler/Spotter), who are currently in command of the field. Then allocate your staff in a way that is sufficient for both the production and grade control team. Do not forget that during the grade control work, you will manage your physically tired personnel to rest or make changes by directing them to production so that they do not take breaks during meal times. Any interruption during the work will bring about many negativities, so in order to improve your predictions, constantly discuss your experiences with your team and evaluate solution suggestions.
Follow the weather forecasts, it is not difficult to predict that it will affect the open mining ground and the work to be done. Take control of your staff’s health, from their clothing to the time they spend at the pit, depending on the weather conditions. Accompany your staff during the work done at the pit, empathize with them and evaluate the conditions. Depending on the weather conditions and the number of lines you plan, you can start grade control working hours early or extend them to later hours, or move them to public holidays, within legal frameworks. Consider your team’s satisfaction here. In addition, it is very important that you follow the open pit excavation process and arrange personnel leaves in terms of your employee needs for subsequent grade control works. Do not ignore the factors that will affect the concentration of your staff, peace of mind is more important than anything else, if necessary, work with less staff, let the work take longer, but do not put job security and the health of the work to be secondary in any way.
Distribute the tasks in a short meeting before going to the field, and immediately send survey department and the sampler who will go to the field and drive the line piles. Afterwards, you can determine the samplers who will carry the materials, provide the logistics, carry out the production and be responsible for other works and start the preparations. Your foreman will be very helpful at this stage; if for some reason he will not be there that day, consider someone (senior sampler). It may be useful in the future to create and file a “grade control start form” to keep track of the grade control work day, conditions and material preparation.
3. Make Preliminary Preparations, Taking Over the Field
There are a number of tools, equipment and consumables that you constantly use in grade control works. For these, you need a sheltered area, a corner, close to your department’s offices. Among these materials; first aid kit, geologist’s hammers, pencil, eraser, hard clipboard, map holder, log and mapping forms, permanent marker, tape measures (>20m), 2 different colored spray paint (phosphorescent pink and phosphorescent green), sample bags, sample tubs/bowls, line stakes, sledgehammer. Apart from these, it will be selected according to your lithology and needs; There are equipment to be determined according to your needs such as air blowers (leaf collecting / blowing machine), pneumatic/electric breakers, crusher tips, air hoses, compressor, angle grinder (cordless), ceramic cutting disc, sample cart. Also remember that you will be in the field for a long time; keep cold / hot drinks, thermos and ready-made food with you if necessary. You can meet your needs by sending a vehicle at certain times to provide the necessary logistic support.
Barricade / strip the area in a way that prevents anyone from entering without permission during your work period in the field taken over by the open pit mining team. Grade control is a work that requires concentration and attention, and in order to prevent all the elements that will distract you, take the strictest precautions you can within the boundaries of the field you have received, now the inside of the boundaries is a work area that belongs entirely to you. If possible, state the equipment requirements and rules at your work site on a sign on the busiest frontage. You can keep this plate in your warehouse and use it in every grade control.
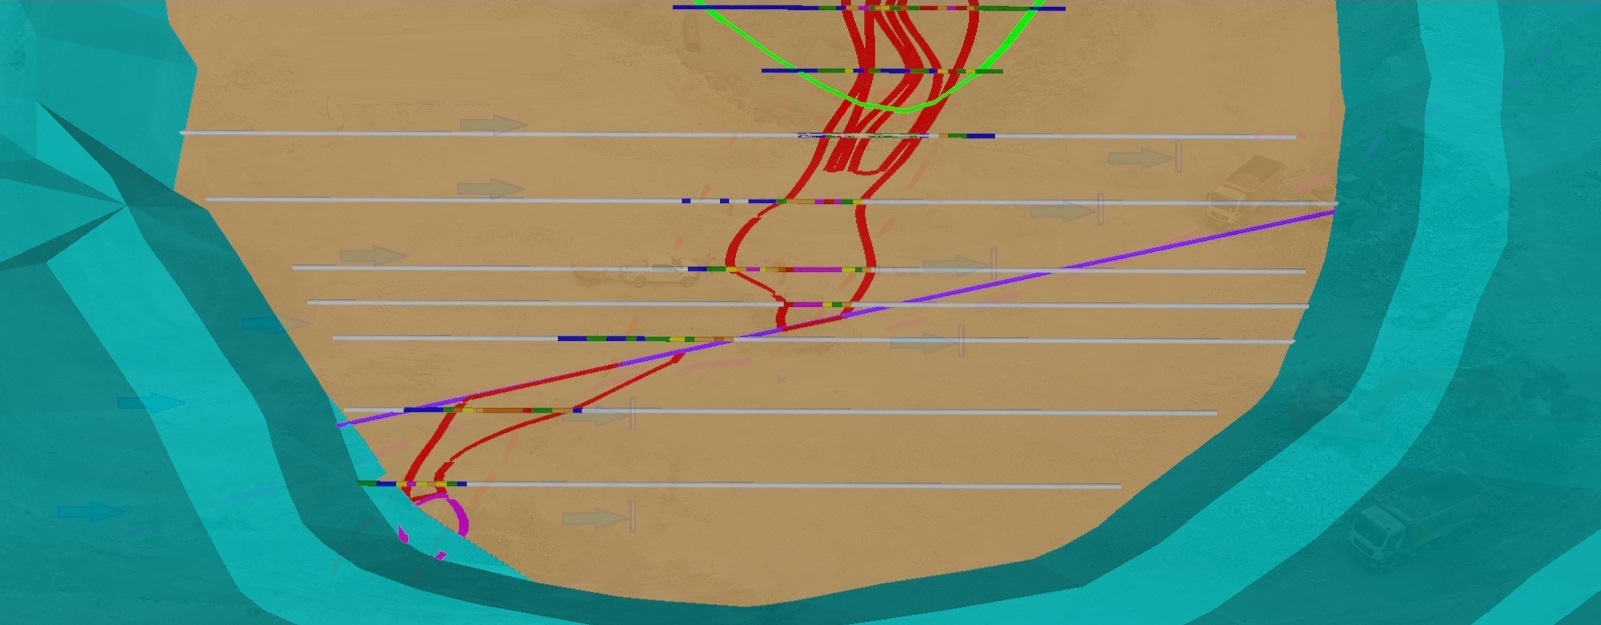
4. Determining Grid Lines
In order to be used in grade control and production, we need to create a horizontal grid that will be determined at the beginning of the project and used on every level in the entire pit plan. This grid should be determined based on the main ore direction, just like in our article on “line sampling”. If the main ore direction is not exactly north-south or east-west, we must create a rotated grid and model. There are several reasons why we do this. The most important of these is to process the lines (channels) parallel and based on one of the axes, instead of using the millimetric paper/map diagonally when making the level map in the field during grade control work. Another reason is to guide spotters “with easily understanding precise meter scale”, to make ore mark up and complete production. Therefore, after creating the grid, the ore markups to be applied in the field will also be marked on the field with the coordinates determined according to this grid, and the direction of progress of the excavation will follow these lines. It should not be forgotten that we may not be able to directly use this grid, and sampling made according to this grid, for resource model update.
We need to choose the type of map projection and sensitivity we will use for the business (3 degrees/6 degrees, etc.), a midpoint that we will determine for mineralization only once, and the angle at which we will rotate the grid we want according to this point. It will be useful for an expert to examine your orebody model to determine the spacing of your parallel lines. However, we can say that production is generally carried out in 5-meter intervals, using lines 10 meters apart. Based on this, you can determine your ore midpoint and designate lines in the last 2 digits of your grid coordinates on each level/floor, naming them in multiples of 10. After completing these, the ore spotters/samplers, the survey department, and the open pit team will follow the production and grade control work on this grid. Depending on the type of projection coordinates you choose, they have 7 or 6 digits, so it may be difficult to use them in communication. In order to be practical in communication, it will make much easier if you pronounce the last 4 digits of your grid coordinates as the line (channel) name and use them on your maps.
Record the determined midpoint (reference point-rotation base) and rotation angle somewhere, you will need them when you drill near mine and project review as well as modeling works. For practical coordinate rotation, there are many GIS and you can also use a simple formulized Excel file.
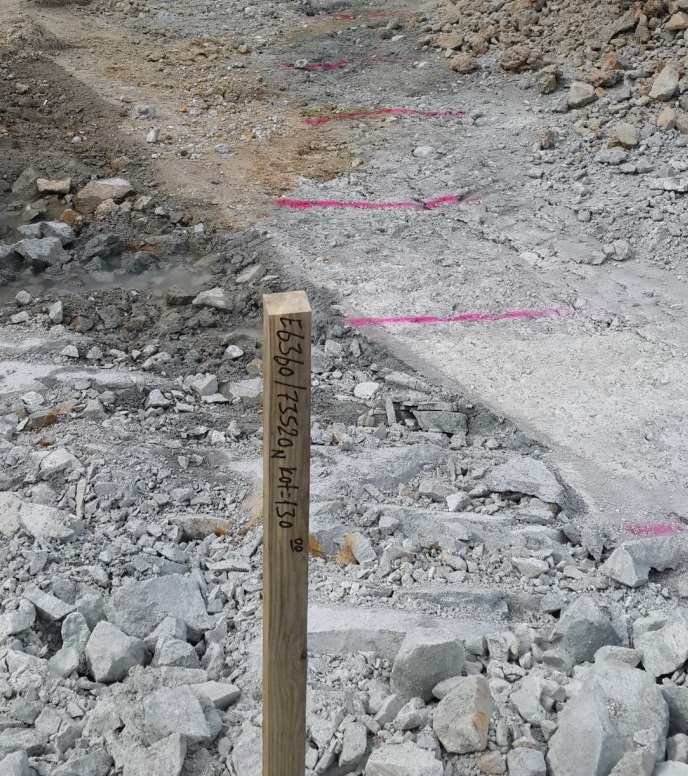
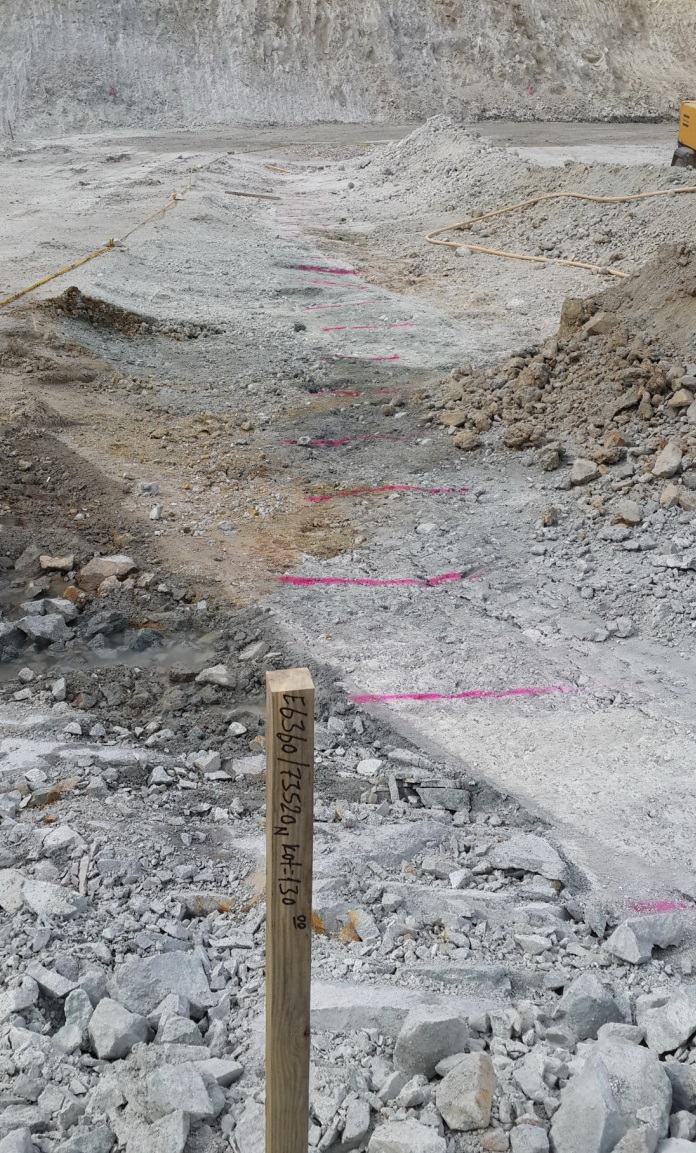
5. Mark the Lines, Drive in "Line" Piles
Before the planned work, without wasting any time, the survey department personnel and the sampler in charge should go to the field to drive the line piles and create the grid in the received field. Mark the line heads within the field, with the last 2 digits being 10 and its multiples, and drive the stakes with coordinates written on them with the help of a sledgehammer. If possible, drive piles at intervals of no more than 20 meters on each line. Write the coordinates and elevation on the stakes with a permanent marker so that they can be read from as far away as possible (3m). If possible, do not make any scribbles on the old piles you use. Before going out to the field, erase the previous writings with a sanding machine whenever possible.
6. Make It Ready for Observation by Scraping the Necessary Section of the Channels
You should make a portable iron plate that is inserted into the lugs of the excavator bucket and fixed with a chain. You can have this done by a welder with dimensions that will be common to all your excavators. This equipment, which we call the “grade control blade”, must be mounted on the bucket of the excavator before working.
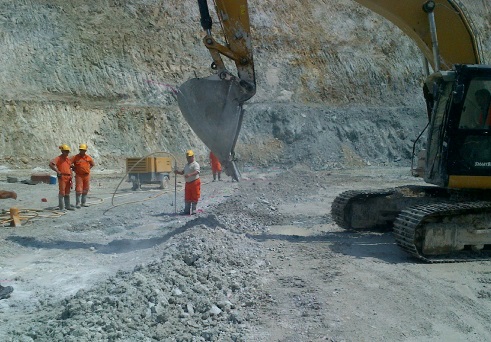
Samplers should direct the excavator operator to open the area between the piles driven on the lines, 1 meter wide, along the entire line. The “line (channel) opening” process consists of scraping the ground flat until you see the fresh rock. If the ground is too hard to break, excavator may be requested for these areas. The sampler who observes this task should carefully separate and mark the scraping piles, especially in the ore zone. At the end of the grade control work, this stacked material will be transported to the ore stock.
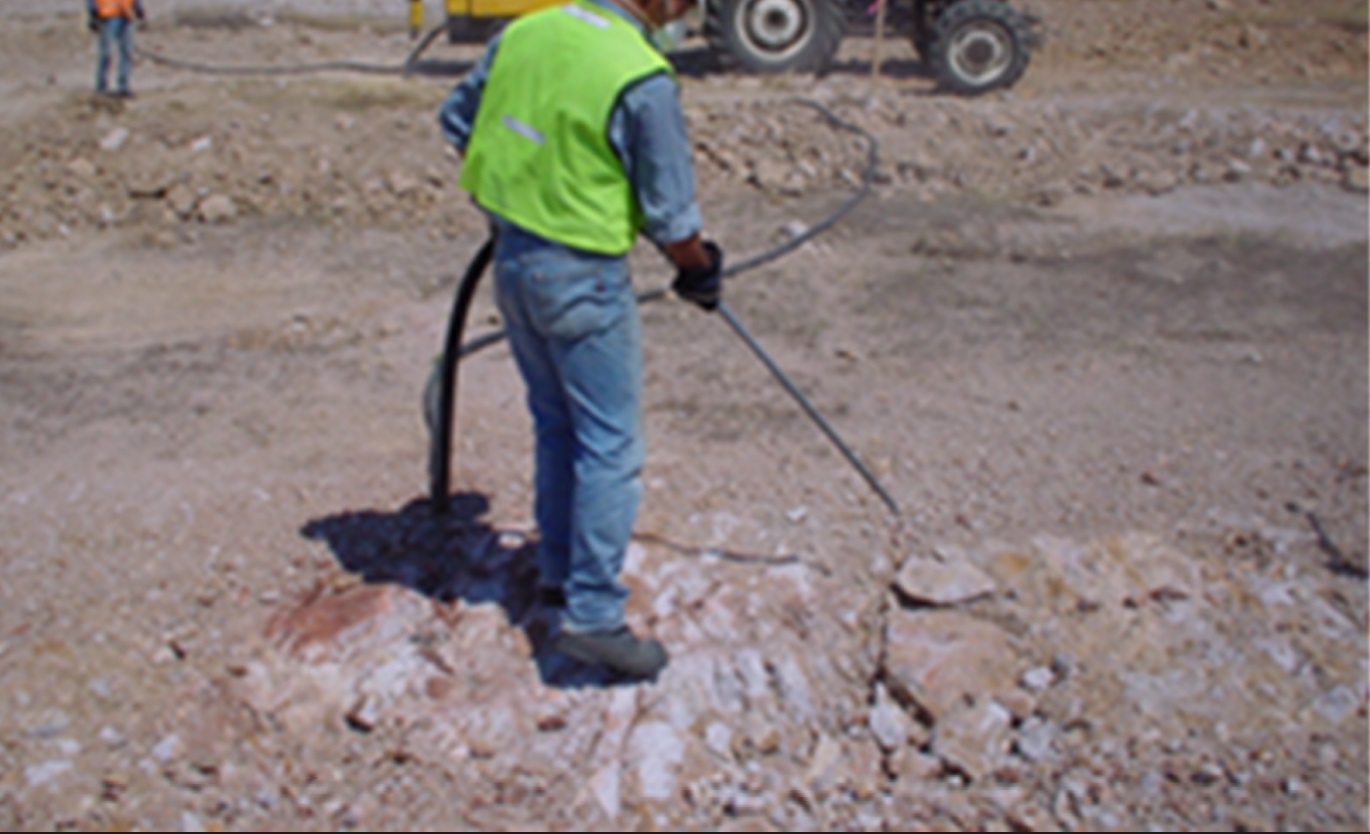
7. Blow and Clean the Engraved Area
As the scraping process progresses, samplers clean the lines with intense air blowing equipment while following from a certain safe distance. This process is done to remove rock fragments and dust that do not represent the surface and is carried out in one direction for each line, from the beginning to the end of the line. You can use a metal device with a shrunken tip attached to the end of the leaf blower or compressor hose.
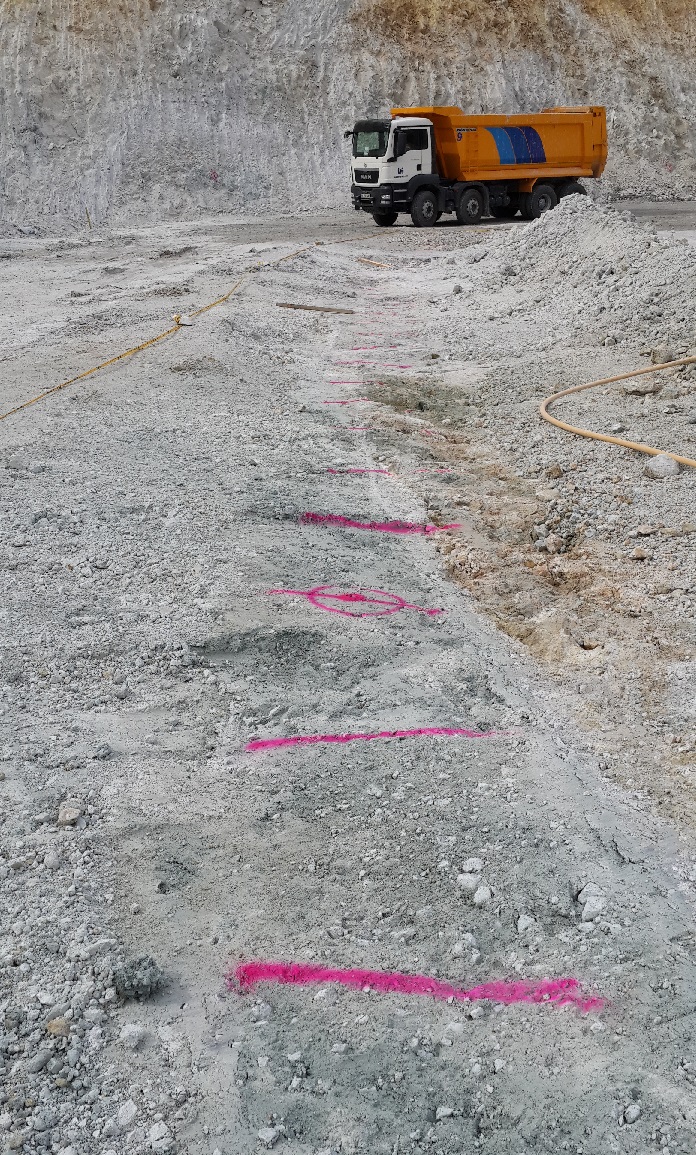
8. Meter the Lines (Channels) and Prepare them for Mapping and Logging
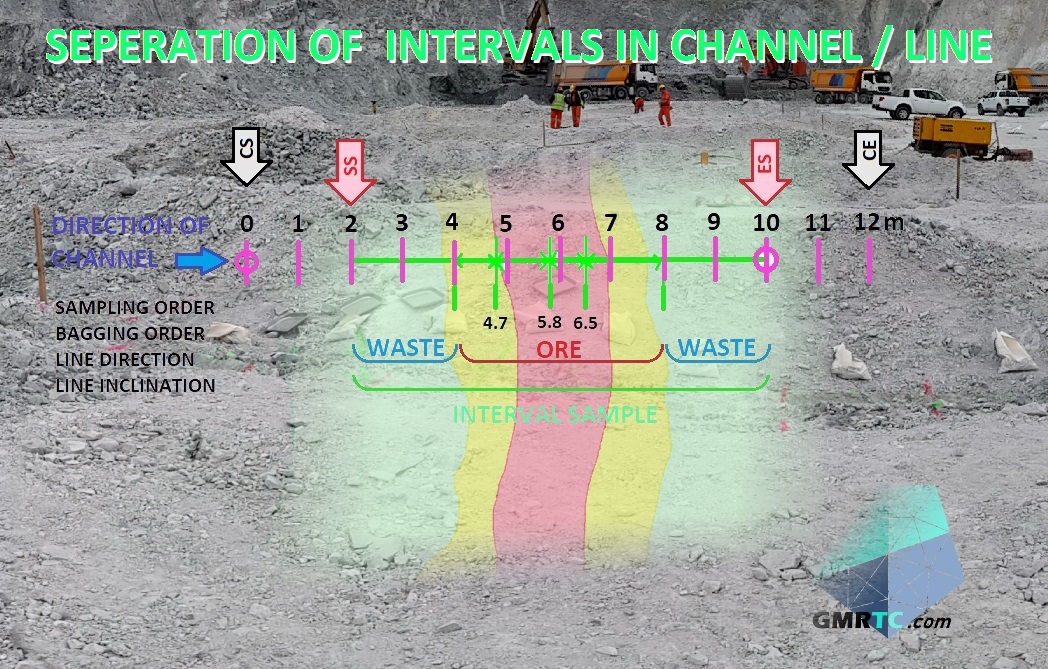
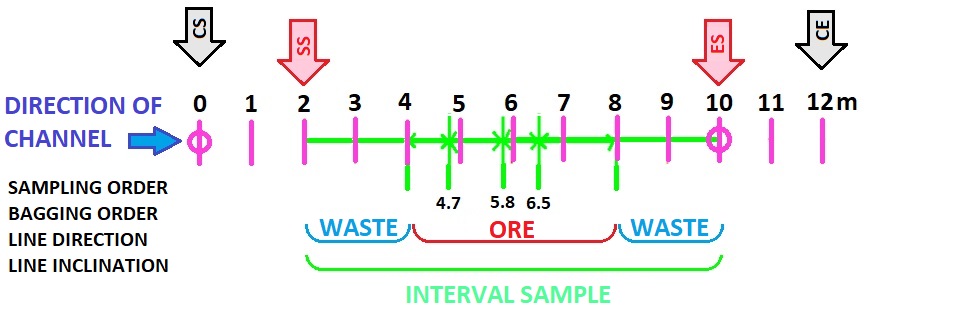
If it continues, metering is performed following the scraping process at a safe distance. Meters are stretched between the piles by 2 samplers, and the third sampler carefully marks the meters on the ground every 1 meter with pink spray paint at least 1 arm’s length vertically. At every 10th meter interval, the line on the ground is extended with the same spray paint and a circle is drawn on it. After the lines are metered, the geologist should be informed immediately.
9. Determine and Mark the Ranges to be Sampled
Geologist quickly walks through the lines one by one, it is beneficial to do this at least twice for each line. Keep millimetric papers and clipboard with you on which you will make a level map. While walking on the lines, mark the entry and exit points of the ore on a grid that you can quickly create on millimetric paper. At this stage, the main issue the geologist needs to do is to decide on the sampling intervals and draw the line to be sampled longitudinally along the line with green spray paint. The important point here is that you communicate with the samplers with some marks that you have painted on the spray paint surface to indicate the area to be sampled. Every question asked or uncertainty that arises will have a cascading effect on the grade control work order, causing serious loss of time. For this reason, geologists and samplers should adopt the most up-to-date working method developed in harmony and continue their work in harmony. It is important to carry out the entire process without question, assuming that the markings are error-free, therefore the geologist must perform “debugging”.
The logic of determining the intervals to be sampled on the line is almost the same as sampling of such as drilling, channel, line and face. It will be more descriptive if we go through the steps one by one, and doing the steps in order will increase your command and prevent all your concerns.
- Lithology is the first criterion to be used in dividing boundaries. Walking along the line, divide the hanging wall and ore contact, then the ore and footwall contact with long lines showing the contacts. If your ore boundaries are not clear here, mark the potential ore lithology boundaries along their directions, which you have followed with the experience you have gained from the upper levels (of pit). If there are zones that are parallel to each other and have “waste rock” between them (“Domain”, “shoot”, area or main ore structure), make a predetermined mark on the ground to determine their entrances and exits and to divide them in sampling.
- If there is a lithology with a significant grade difference that you have previously identified within the main ore structure or zones, draw its boundaries in the same way with green spray paint. On the contrary, if you can observationally separate barren phases or low-grade lenses within the main structure, divide these lithologies as well.
- Afterwards, make “sample start” and “sample end” markings a few meters before and after the entrances and exits of the zones, taking into account the size of your pit plan and the possibility of obtaining ore from the possible alteration zone around the mineralization. While doing this, if you are going to perform discontinuous sampling (with waste in between) on the same line, you can name and number the sample beginnings and sample ends, as you divided into zones in the first step. For example, you started walking from the hanging wall, the “sample start” you determined before the first zone was “SS1”, then you continued walking, you left the ore back, went in to the footwall and walked a few meters, then “ES1”. Afterwards, walked into the “waste” that you would not sample within the footwall, and entered the other zone again. Likewise, you specified the sample intervals by marking “SS2” and “ES2” when exiting.
- This step is actually based on a standard that you will create at the beginning of the project by determining the maximum and minimum spacing of seperation, taking into account the mineralization dynamics and your budget. It is important to make a decision in consultation with an expert on this issue, where many factors need to be evaluated. If your mineralization features have high transverse continuity and your “high grade ore mineral” can be visually distinguished, you can keep the splitting interval as long as possible and reduce the number of samples. However, if your ore element is invisible to the naked eye in the ore rock or in grams per ton, it would be more appropriate to keep your division spacing to a minimum. If you need to comply with resource and reserve reporting standards here, you may need to keep the intervals to a minimum, taking this issue into consideration. Sometimes your target tonnage and therefore the average excavator bucket size you will use may allow you to increase this. For example, for a vein-type gold mineralization of hydrothermal origin (on a gram per ton scale), you can use the division spacing standards as maximum 1.5 meters, minimum 0.5 meters, and optimum 1 meter. To give another example, for lead, zinc or copper mineralizations in massive sulphide (types such as VMS, Sedex, Skarn) you can keep the maximum range as much as the thickness of the main sulphide zone (sometimes 2 meters or more). Optimize your number of samples by dividing the samples according to these standards, the limits of which you determined in the previous steps.
- If each meter interval in metering (pink sprays) will be used, drawing a straight green line on the ground along the line will be sufficient to tell samplers that “each meter here will be represented by a sample”.
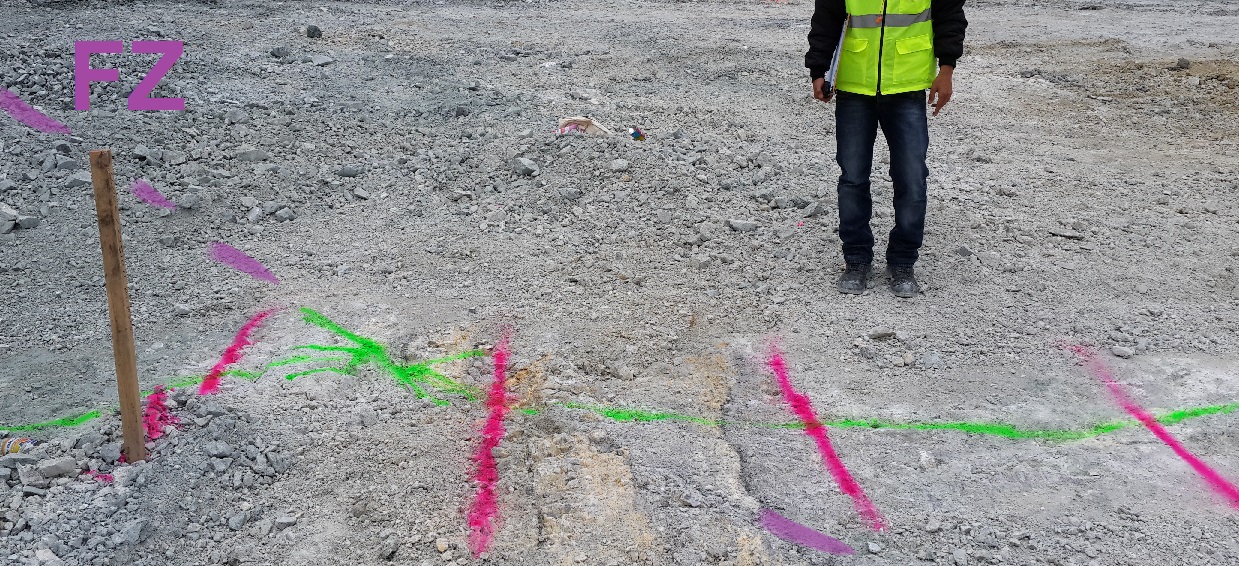
- If a division was made at meter intervals for sampling (e.g. 1 sample between 1.5 meters and 2.3 meters), in addition to the straight line continuing on the line, sample boundaries perpendicular to the line with a length of more than 1 meter are marked with green spray paint. The measurement value taken from the beginning of the line is written at one end of the line, in a direction you determine at the beginning of the project. These measurements will be useful for entering the measurements into the grade control line log.
- If the division process is completed, the geologist or assistant personnel can start preparations for the grade control log and enter the meter intervals that have been marked in the field into the log.
- Samplers should know that digging/breaking and sampling should be done on the line drawn to indicate the intervals to be sampled on the line. In exceptional cases such as rock hardness within the divided interval and the possibility of mixing, they may go out of line in order to continue sampling from the sections representing the interval. For this reason, in order to avoid any room for initiative, rather than trying to sample the area that is difficult to dig/break, the geologist should pass the line through the fractured area that represents the same point and can be broken more easily.
- At this step, it is extremely essential to involve the team in the work and pave the way, because from this point on, the remaining part of the work is time-consuming and tiring. If possible, before the grade control sampling, it is useful to note the ore intervals or potential areas and major faults by using the samples and maps on the upper levels. A sketch on a small notepaper may be taken by, but it is entirely dependent on the geologist’s experience.
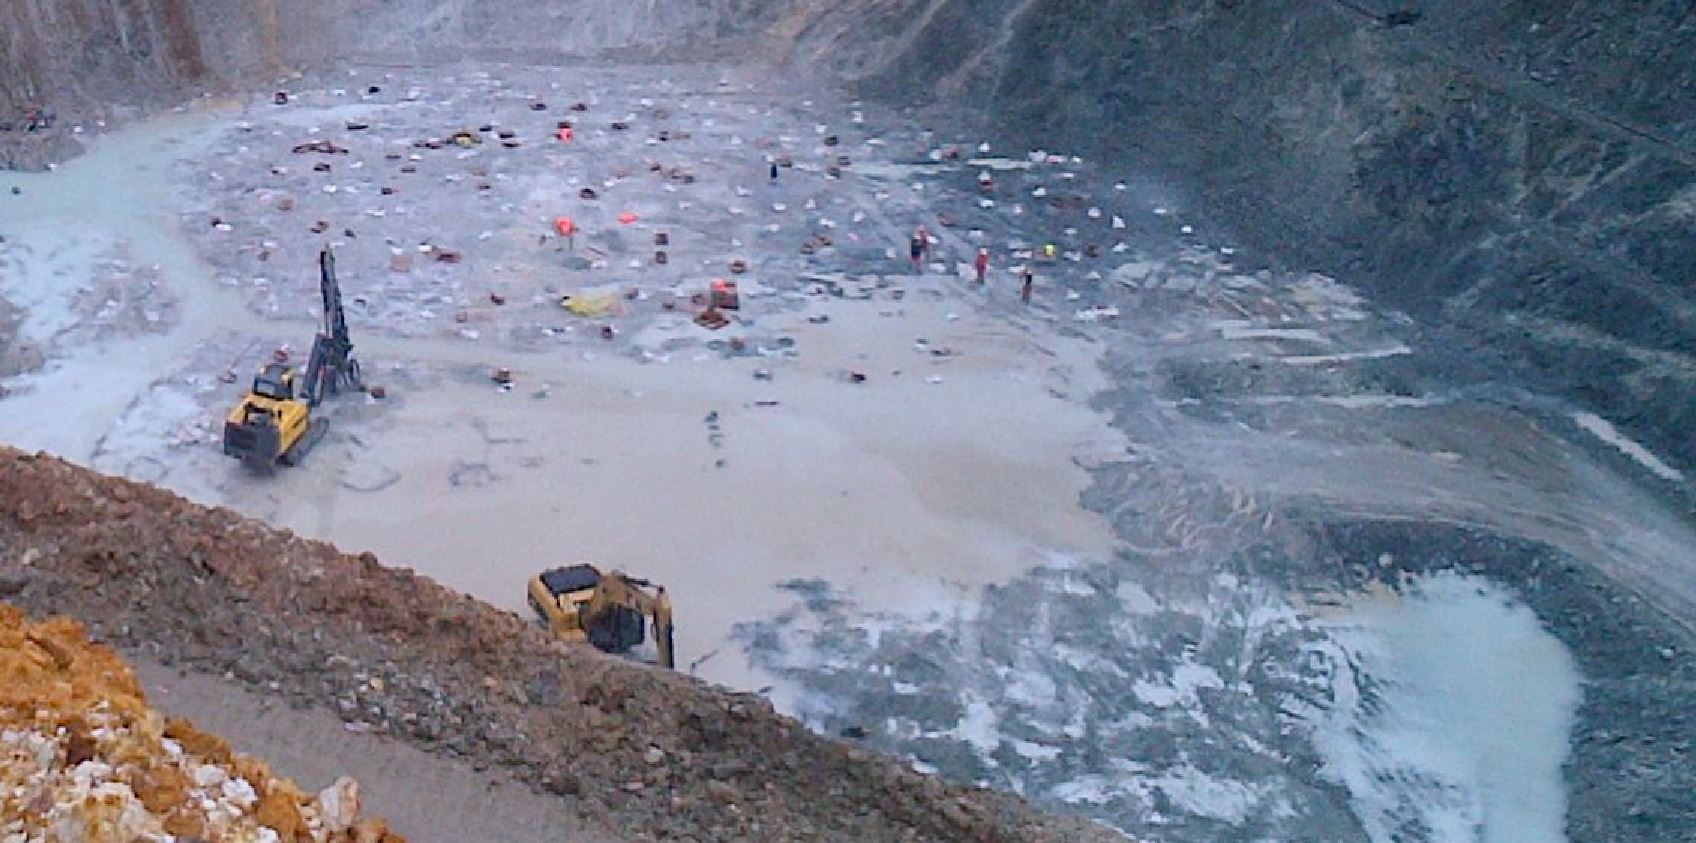
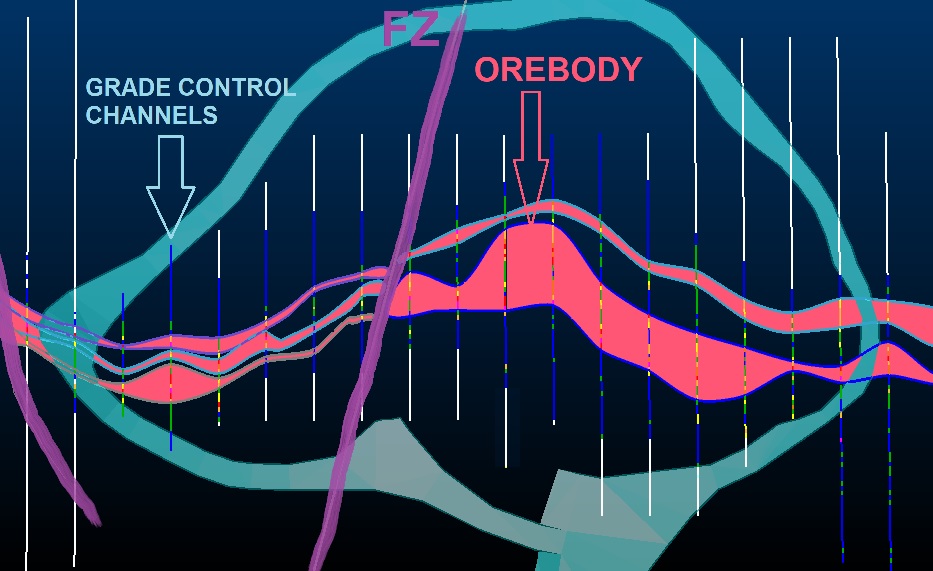
10. Photograph the "Ready and Clean Ground" from Above - Aerial Photo
For sampling, while your lines are open and clean before digging/breaking, photograph the field from the air with a “drone” in as much detail as possible. In the worst case scenario, climb to a suitable high observation point and photograph the field. Since you will see the big picture with these photos, you will have very critical information in terms of modelling. A lot of information, especially the slips on the ore (by faults) and your ore geometry, will be clearly in your mind. As a geologist, your control over the mineralization in the pit will increase and you will carry out more efficient grade control and production activities.
In addition, you can hold useful production meetings with your excavation team and samplers/spotters through photographs. You can create very special experiences for yourself and your friends by combining the surface photos of the entire level after the level is completed. Be careful to save the photos in the appropriate format on the server. During the modeling phase, you can interpret the structure and detail your drawings by covering the wireframe (dtm) of level.
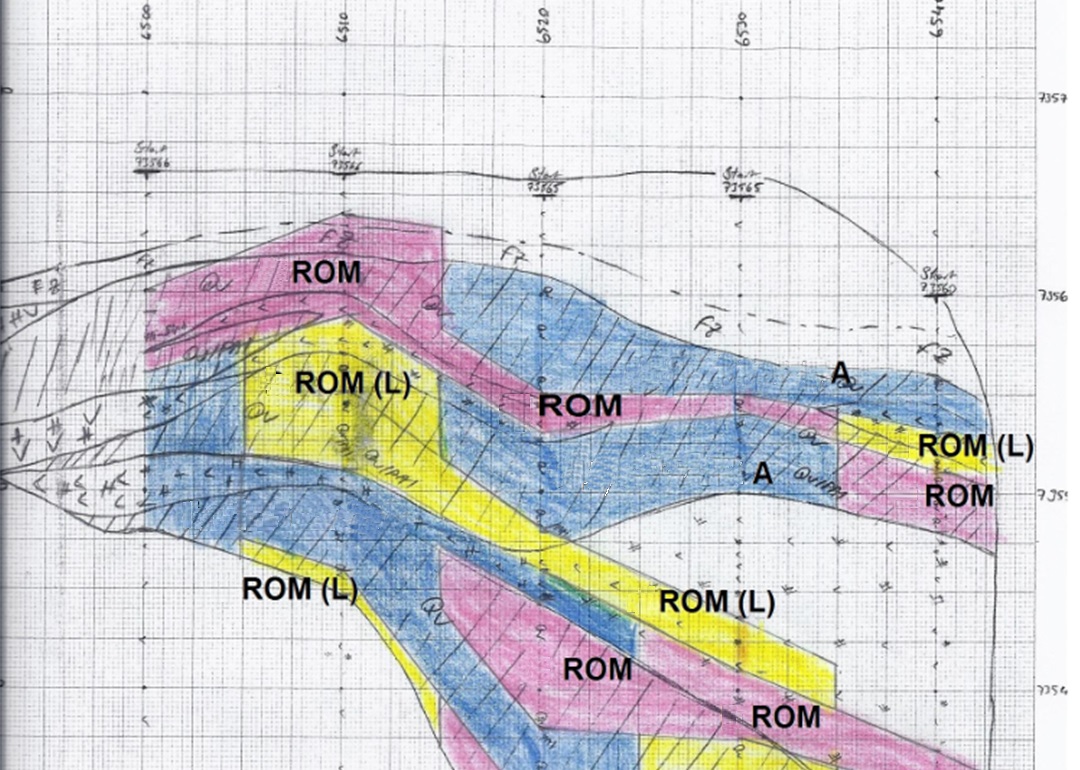
11. Level (Ground) Mapping
As you can see from the sampling step, although mapping actually begins with determining sampling intervals, you do not want the entire team except the geologist to be idle in the field. In order to prevent this, you should quickly determine the sample intervals of the first few lines and leave the mapping until later, allowing your team to start somewhere. During the grade control work, the geologist must master the field and quickly process the elements on the map by mastering the field through the lines despite the changing topography. At this point, let us remind you that it will be very useful to read this entire procedure again from start to finish after your first grade control process.
The level map you will create will form the basis of the grade control program and production. In order to perform this mapping without any errors, you must also master the production process in order to understand what it does. You can follow this in our relevant article (OP Production). Level mapping is a basic geological map and should be performed with centimeter precision. In level mapping, no scribbling should be made, lines should not be drawn on top of each other, unnecessary qualifications should not be made, symbols inside zones should not be used too frequently, and the ore boundaries under the cover should be clear and simple. The main elements you will process in the level mapping you will make on millimetric paper;
- Boundaries of ore veins and other mineralization zones (Hanging walls [HW], footwalls [FW]),
- Faults and their strike/dip at that point if you can measure them,
- Coordinates of line starts and line ends,
- Slope and the road boundaries.

Organize your millimetric paper and, if possible, fit the grid so that the mineralization area you have determined is in the middle of the paper. Write the numerical line names on the millimeter map page, parallel to the line, at the top of the map (the common X or Z coordinate according to your choice). Write the coordinate value by marking the “line start” you determined on the other axis. Since you will have to use more than one millimetric paper, especially in large pits or at the upper elevations of the operation, use the 3D digital pit plan when determining this grid. Make the best planning before you get to the field, determine from which coordinates you will start the lines, and prepare to use the mapping paper in the most efficient way. Remember, these maps will be used by sampler personnel, production markups and production excavation. Whenever possible, make “perfect” sectional maps so that the ore body is centered on the paper. Initializing the line start coordinates as 10 and multiples of 10 in the last 2 digits will be very helpful in entering the grade control log and sampling control. Also, while the line coordinates are being processed, ask the samplers to drive piles specifically at these coordinates, it will greatly increase your command of the lines while processing the map. The precision you use on the millimetric map is important. In general, it will be useful to use a length of 4 cm (4 thick lined squares) to represent 10 meters (1/250). If the production grade group within your ore body does not change frequently and the mineralization is quite thick, you can reduce this scale even further.
You have determined the line starts and entered them on the map. Mark these elements as dots on the millimeter paper (level map) by walking the lines from beginning to end. If you are continuing the line in the previous grade control process, if no structural element is observed between the 2 lines, draw a line between channels and combine them. Observe the areas you are not sure about by scraping the ground using a bulldozer, excavator, or a grader. When samplers detect fault elements on other levels or in previous lines at the time of production, they should report this to geologists and even demonstrate it on site. Geologists should immediately add such elements to the 3D digital project and use them when updating the grade control model. Specify using the lithology and structural element symbols that correspond to the areas you created on the map. Do not use symbols more frequently than necessary. As a result of the grade control program, production markups will be placed on the map and production will be carried out with these. Scan the level maps in the office environment or photograph them for scanning purposes, you will use them as a basis when creating the grade control model.
12. Digging/Breaking for Sampling in the Marked Ranges

After the geologist marks the intervals to be sampled (drawn with green paint), digging/breaking process is carried out from a safe distance back. The sampler can do this with a pneumatic or cordless electric digger, or able to have it done with the help of an excavator by observing it precisely. During the crushing process, everything must be done to prevent the broken rock from shifting, otherwise the sampling will not reflect the correct location.
13. Grade Control Log Meter Ranges Entry
In fact, a personnel must be determined to assist the geologist throughout the entire grade control process. Especially in this step, this assistant personnel, preferably a foreman or an experienced sampler (maybe an experienced intern), will make the geologist’s job much easier and prevent confusion. While the geologist walks through all the cleaned lines, marks the area to be sampled and clears the way for the team, the assistant staff determined by the geologist fills in the main headings, separately for each line in the “open pit grade control log” forms that will be created. For each line, it is processed on the same form by asking the geologist for the coordinates of the line (channel) start and the measurement (the meter on the line SS-ES, etc.) from which the sample started, and getting confirmation. Afterwards, the assistant staff carefully begins to write down the intervals on the log form.

While doing this, he writes “0” (Zero) in the “From” column in the first line where the geologist writes the line (channel) start coordinate, and then to the next line writes the “sample start” meter, where the geologist first starts drawing for sampling, in the “To” section, and writes “-” in the corresponding line in the “sample number” column. “ Draws (hyphen). Then, assistant travels all the lines one by one, from the beginning to the end, and writes the measurements in the divided intervals on the ground, one by one, onto the form. In other words, it makes the geological observation ready for processing by writing all interval meters to be sampled, starting from the meter where the sampling started, to the relevant lines on the form. If your lines are straight and going in the same direction (or if you assume they are straight), you do not need to enter coordinates on the lines other than the starting coordinate on the form.
14. Adding Quality Assurance / Quality Control (QA/QC) Samples
Our procedure, called “quality assurance / quality control” and which generally causes some misunderstandings in the market, is actually a very simple process. We should not confuse the syntax “quality control” with “grade control”. In addition, by “solely performing this procedure” we are not meeting JORC, NI 43-101 or other CRIRSCO member standards.
If you are sure that you have entered all intervals on the line correctly into the log form, you can determine which samples to include “quality assurance / quality control (QA/QC) samples” by counting the samples you will take. There are generally 3 types of QA/QC applications in total that you plan to implement at intervals that you think are periodic and ideal. As you can imagine, the quality assurance protocol is a process that should be designed according to your project and your company’s needs. Stating that it will vary, we need to list these examples in general and the periods in which they should be applied;
• Certified standard sample (Standard); every 30 consecutive samples,
• Taking a duplicate sample (witness sample) by sampling the same ore range a second time in the same way; every 50 consecutive samples,
• A blank sample (Blank), which is previously known to not contain your ore element, is optional, but it is appropriate to place it at the end of each line.
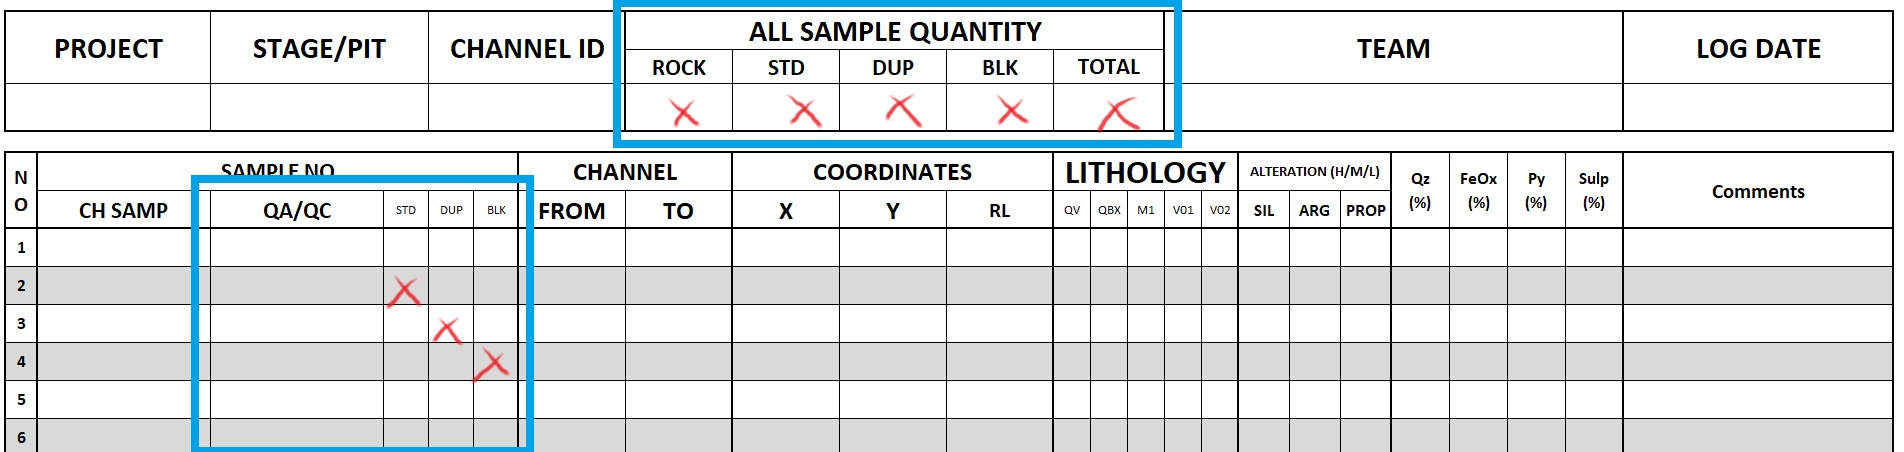
When the grade control work is completed, the assistant personnel will check the loading of the samples into the vehicle by counting the samples on the “grade control log” form. After entering the log ranges and sample numbers, do not forget to enter the total ore sample for each line (remember the number of double samples) and the number of quality control samples you will add later on the form. When loading samples into the vehicle for shipment to the laboratory, include your quality assurance samples (Standard and blank samples) in the shipment.
Enter the sample numbers in your grade control log without any spaces. You have now clarified the sample numbers corresponding to the meters.
15. Writing of the Sample Bags and Place the Tubs in the Sample Ranges
While all these works are continuing, sample tubs/bowls (Gastronom cuvette) are placed in the broken intervals, that is, one in the middle of each sample interval marked with green paint where sampling is requested. If the sample bowls are not sufficient, the bowls emptied in other lines are moved to new lines by blowing air into them.
It will be easier in the field if the samplers write a certain amount of sample bags, starting from the first number in progress, while they are available before grade control. In the office or in the field, sequentially numbered bags are placed under the filled tubs/bowls. Depending on the situation, you can fill these bags directly with samples, and the geologist will make the most appropriate decision by evaluating the conditions.
16. Sampling Ranges
Samplers quickly and alternately, with the help of a geologist’s hammer from time to time, fill the broken rock chips into the tubs at specified intervals on green painted lines. The most key elements in this step are the experience they have gained in production, grade control studies, stockpiling, drilling sampling and other field studies and their ability to recognize ore minerals. Samplers should place equal amounts of rock pieces into the tubs to represent the intervals determined on the line along the line.

As a trained eye, it should not sample certain clustered, relatively easy places within the range that will be relatively obtainable with textural differences. In addition, they should take samples by observing the lithology in the interval, without ignoring the possibility of broken samples spreading to other intervals. If there is truck traffic around, it will be useful to take precautions to prevent dust and noise (concentration disorder that may occur during sampling near the road) and to prevent this from affecting the sampling health, by watering the roads or stopping the haulage for a short time.

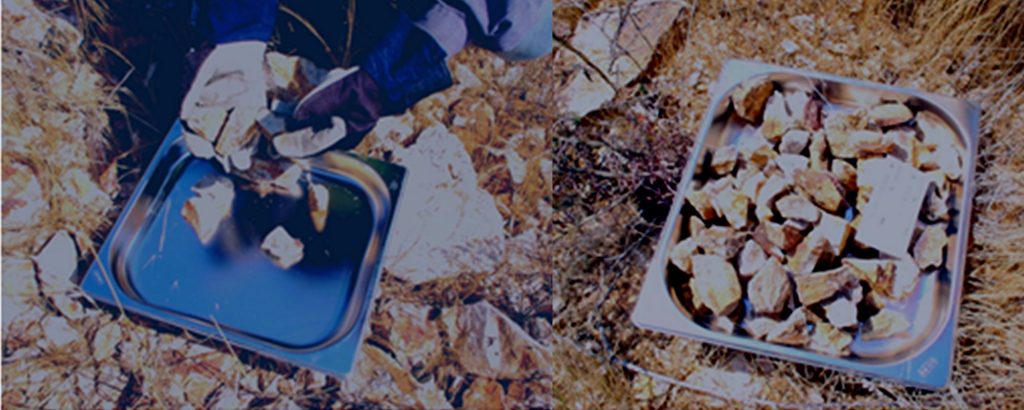
The amount of sample to be placed in the tubs should not exceed the 5 kg limit, if possible, and the optimum level should be determined as 2.5 kg. For this purpose, samples should be taken from the broken ground continuously throughout the interval as if it were maximum half of the HQ diameter core.
17. Grade Control Logging
Your assistant has filled in the main headings of the grade control log form and the meters you divided on all lines (channels). Now it is time to check all and quickly enter your geological observations into the form. You can create different types of forms according to your needs. Let’s go step by step through a successful example form for practicality in the field:
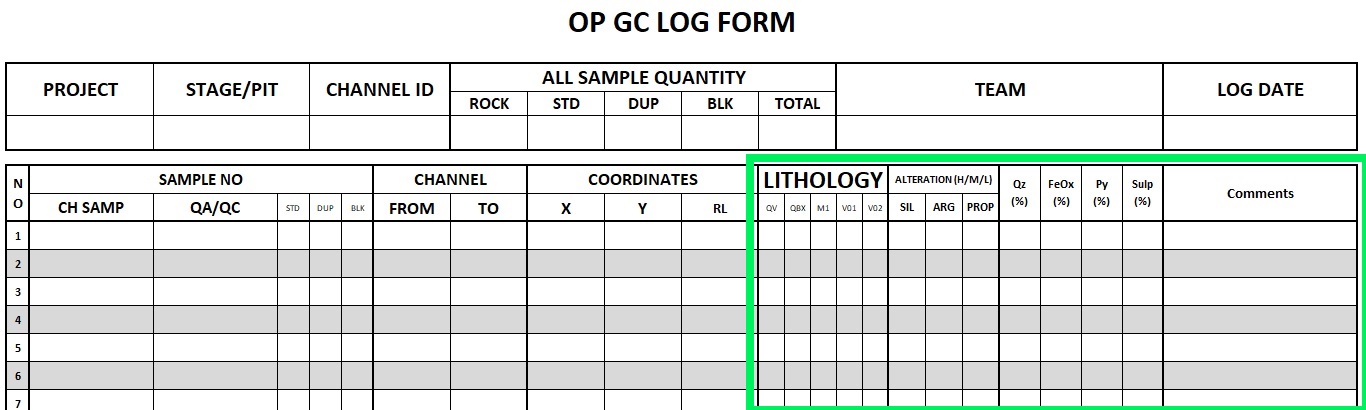
- Sample numbers and interval “From-To” meters were entered by your assistant or you entered them,
- Mark the primary and secondary lithology intersected in the interval. If the same lithology goes on continuously, you can draw a line scribble from top to bottom on the boxes in the form for practicality in the relevant intervals.
- Record the observed alteration and mineralization in the lines of the intervals, as in the lithology selection, and you can write down what you want to note in the comments section.
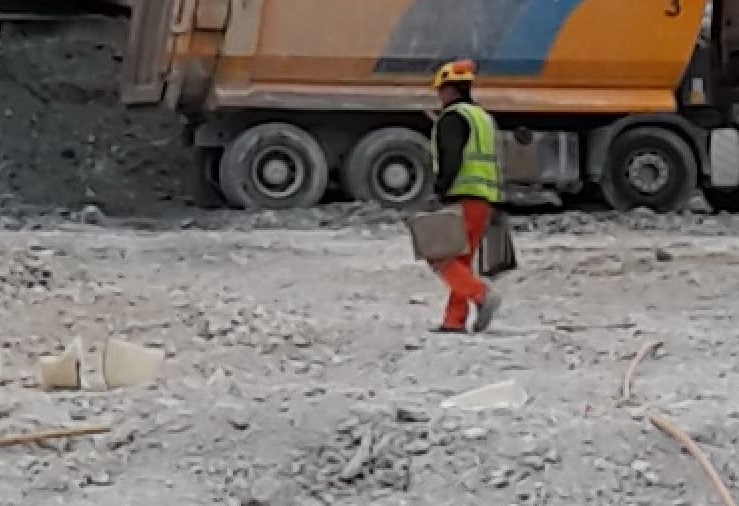
18. Bag the Samples, Leave the Field
With the declaration given by the geologist after the last observation, the samplers fill the rock pieces in the bowls into the written sample bags, one by one. Samplers who will do this job can organize themselves to be faster. Then, another sampler writes down the ranges of the samples on a fixed copy of the slips/sample book, cuts off the slip number (ticket) and throws it into the bag. Afterwards, the bags are tied and the samples are taken to the delivery vehicle.
A skip or loss of a sample while collecting samples may throw the entire grade control work into doubt. For this reason, we must have a self-control mechanism, a habit that we always use. To give a good example of this, collecting filled sample bags is done routinely and separately for each line. It is not possible to move on to another line without collecting samples of one line. Naturally, more than one person brings the sample bags to the vehicle. The duty of the person who brings them first is to wait at the truck bed and then make the addition of sample quantities that each person who brought the sample will tell. The person appointed confirms the total number of samples written on the log forms and moves on to the next line. In case of any error, all line samples are listed on the ground, the deficiency is determined and corrected. Do not allow anyone into your field without permission, especially in the last part, until the geologist informs you that the “grade control” has been completed. Even with good intentions, a small mistake that may occur during sample transportation can turn into a big mess due to fatigue after a long day.
We will leave the site by carefully collecting all materials and garbage we bring to the site, as well as grade control samples. The deficiencies in the grade control chest should be eliminated and at this stage, a copy called “grade control study completion form” should be filled out. For job safety, do not neglect your limits when carrying samples. Each sample will weigh between 3-5 kg on average, sometimes you may need to load hundreds of samples into the vehicle. You should be careful when driving a loaded vehicle on slippery surfaces such as open pits, and remember that the amount of load in question will directly negatively affect your braking distance.
While opening the lines, you also had the ore sections excavated. Do not forget to haul the material / groups consisting of these sections to the relevant ore stocks or to the area you have specifically determined for sampling.
19. Office Work After Grade Control
You should save the data in the forms you obtain during grade control process under your server and storage area. You must scan your level map and enter the grade control log into a digital spreadsheet file (Excel). You must define and save the faults you detect in your 3D digital project in order to cut the model. After scanning your level maps, you should draw the ore boundaries observed in the level in your 3D digital project and prepare them before the analysis results arrive.
Once the analysis results arrive, you will take the entire model into consideration, create the “markups” on the production map, and give copies to the samplers to start the production, along with the log documents with the ore boundaries processed. You will value the material you stock by updating the grade control model and calculating the average grade of your level production. Since this and the next phase of the cycle is the “production” phase, it will be explained in detail in our article about open pit production.
Subjects discussed in this article may overlap with your mineral exploration, modeling, mining operation and business development issues and may provide solutions for those. However, remember that various factors specific to your business may bring about different challenges. Therefore, seek support from expert consultants to evaluate all data together in order to convert potential into profit most efficiently.
Should you have any questions regarding the articles or consulting services, please don’t hesitate to get in touch with us.
GMRTC Mineral Exploration & Modeling & Operation Consultancy
Istanbul - Izmir - TÜRKİYE
SITE MAP
CONTACT US
Before quoting or copying from our site, you can contact info@gmrtc.com
All elements (texts, comments, videos, images) on the GMRTC website (www.gmrtc.com) are the property of GMRTC unless otherwise stated, and are published to provide insights to interested investors, professionals, and students. Any detail that may arise during your process will affect the subject matter you are interested in on this website; therefore, GMRTC (www.gmrtc.com) is not liable for any damages incurred. It is recommended that you consult experts with all your data before making any decisions based on the information provided.