
Underground Grade Control Program for Mining Operations
All the work done for unearthing the ore body during the underground mining operation; “collecting the data, locating the ore in detail, unearthing the ore body in the cleanest way possible, and stock it until feeding crusher“, can be described as “grade control program“. The underground mine geology department carries out the grade control program and directs the ore drives (drifts, stopes, galleries, tunnels) in the underground with the results obtained from these studies. The mine geology department, responsible for ensuring production and dividing the extracted material into classes, consists of geologists, foremen, drillers and samplers. You can replace this process with different personnel and solutions depending on your operation.
Non-stop shift work is preferred in underground operations. It involves dangers and risks as many people move in the same closed and narrow space. The efforts of shifts to correctly understand “the work they leave to each other and take over from each other” and complete their tasks are also important in terms of communication. The necessity of serious coordination between underground production and planning, mine geology, occupational safety and all relevant teams is indisputable. At least having a minimum knowledge of each other’s critical and continuous operation processes will ensure correct communication and trouble-free production.
Additionally, you can explore the related articles listed below.
Why is Underground Grade Control Program Necessary?
Grade control studies are carried out in underground and open mines for the same reasons, although there are slight differences. Let’s examine the requirements item by item.
- If you need to follow up the ore bodyu geologically in your underground operation with high efficiency,
- If you have a shift work operation and need someone to regularly monitor your entire ore body production,
- If you are working with commodities such as gold (Au), silver (Ag), copper (Cu) and many similar metals, whose grade values are too low to be determined visually in ore / gangue minerals,
- If you need to know the average grade/quality in terms of the process while hauling the material you have stocked to feed or sell to the process plant, or if you want to transport the material at the desired grade,
- If the grade coming out of the process plant and the grade you feed into the process do not match or you have doubts, or if you are experiencing consistency problems in the grade of run-of-mine (ROM) ore you sell,
- Important: Operations will naturally want to start production from high grade zones in order to obtain the highest income from the beginning. In addition, it will aim for this to be sustainable so that it is a salve for the deficit caused by investment startup expenses. If you do not want to have problems in this regard, you can start by developing a healthy grade control process.
- Do not rely on the model created by analysis and interpretation of 8-10 cm diameter cylindrical core samples with variable spacing and go into production directly. Someone should supervise this process.
- Underground production conditions are extremely dynamic processes. It is very difficult to obtain information other than data obtained from narrow outcrops. The operating plan can be changed or retouched as a result of any problems encountered. At this point, the location of the ore body should be mastered with as clear data as possible. It requires extraordinary follow-up.
Fundamentals of UG Grade Control
Whether you proceed with modern mechanized underground methods in a corporate structure or with ancient operating activities on a relatively small scale, you are implementing some kind of grade control program when unearthing the ore. Regardless of your professional group, your personnel who perform this process produce and stock the ore, sometimes with their experience and sometimes with the system they inherited from their ancestors. Even the most modern grade control studies available are updated from ancestral methods. It is inevitable that these methods will be updated with developing technology.
Let’s consider a basic underground operation workflow from the beginning of the decision to open a mine. As a result of exploration activities, your mine planning department works to create a “long-term” mine plan using your modeled ore body and, if possible, a block model. They plan the entire mass as an “open cut” to the elevation deemed appropriate, and the deeper part as an underground mine, or the entire mass using only one of these two methods. For underground operations, production plans such as “drives, drifts, galleries, stopes, etc.”, which will be driven over the entire ore body, and underground roads and ventilation galleries that need to reach them, are drawn in the 3D design program. All these lines and/or solid volumes (wireframes) are budgeted into years, months and even weeks. Underground conditions are quite dynamic, the ore will show many different changes and structures as you go into detail during its production. For this reason, it is inevitable to evaluate this plan dynamically in mines. In mines, a “detail planning” team, generally defined as the technical office within the excavation/production team, will carry out this duty properly. At this point, the mining geology department should keep communication open with this department through continuous correspondence and meetings on 3D environment (Design programs). In addition, mining geologists should direct production with maximum efficiency and error-proof by fine-tuning over the plans while the production team executes them.
In grade control studies, sampling does not have to be used for every progress. This sampling period should be determined by standards by evaluating many factors, from your budget to the internal characteristics of the ore body and ensuring fairness within the shift. We will discuss these issues in more detail with examples.
Unlike open pit mines, underground grade control “type selection” according to the ore body and mineralization origin is not possible.
We generally operate underground masses of vein type or similar structure. For this reason, although there is not a big change, you can run the program by selecting the appropriate species from our grade control samples.
Don’t let the wording we define as “dynamic process” remain in the air, we can also call it “variable situations”. Let’s explain with an example: The ore gallery, which normally should have driven straight in the given direction, caused the entire team to be focused to this section, together with the collapse of ceiling, due to the fault you encountered underground after the blasting. The surface was closed and fortified without wasting time. In this case, your other work was disrupted and you could not map the existing face. Moreover, the water found its way and started to penetrate into the gallery as a flow along the fault, so you cannot progress/drive further. Rest assured, there are worse things going on, what we mean by “dynamic process” is explained roughly here.
In mining, you will often hear the word “budget”, which has the same origin as “budgeting, budgeted, budgeted”, especially from planners. Although the “budget” actually represents an income-expenditure, the “progress” intended to be made in a gallery in weekly / monthly planning or the tons, ounces, etc. planned to be obtained as a result of this progress. It can also be defined as the amount of ore. It is worth mentioning this from the beginning, as it will be mentioned a lot in our article.
You should keep many statistical calculations aside in the grade control program. The most important of these are the amount of samples per ton and the number of samples you need to take to approach the absolute correct grade value on the same mass. Making accurate and experience-based calculations here will give you sufficient reliability limits. Otherwise, you can accurately represent the unit mass with 100 samples or 10 samples which will lead you astray. Don’t be afraid to use expert experience and science to achieve optimum values and a healthy start for sustainability, you will benefit more than you expected.
Now we are ready to examine the underground grade control studies and program elements step by step, which can be considered as a unit, starting with a simple “plan meeting” in the office and completed in the stockpile.
1. Determining Weekly Work Plans, Setting the Agenda
Underground operations are sorted from long-term plans and a weekly plan is prepared by the technical office. This plan can also be monthly, you can shape the other stages according to the periods you determine. The plan consists of lines or solid volumes for each progress in a 3D digital environment, and a simple table (sheet/print out) containing the metering and volume data for the progress to be made in each gallery.
This plan is carefully selected by the planning team from high/low grade areas, taking into account the current situation, whether it is currently being worked on, when it is time to work, or what is budgeted. At the meeting to be held with mining geologists at the beginning of the week, the opportunities, completions and geological issues of these galleries and their surroundings will be discussed. We can address these topics as follows.
- Approaching a serious fault zone; the possibility of increased risk of loose ground, significant risk of water intrusion,
- The “obvious” possibility of lower than the planned grade values realization,
- It is expected that the ore body will end within the current progress and therefore the drive should be continued according to the sample result to be taken from the face,
- Due to the expectation of realization in “low grade”, the necessity of minimizing the drive widths and, if possible, their heights,
- The necessity to keep drive width at maximum due to the ore mass expanding at the current elevation and not forming 2 side-by-side galleries,
- The necessity of excavating the ore bodies that are likely to be left at the exit, taking into account the production in the lower and upper levels (ceiling, floor, shoulder, wall bottom) and taking a note in records,
- Request not to build support due to need of sampling side wall legs (combination of side walls and base),
- The need to sample the sludge during drilling with short drilling tools or when drilling (blastholes) the face (RC),
- The necessity of testing secondary zones intersected in prior drillholes passing nearby,
- Request to ensure the supply of high grade or sulfur-free / sulfurous / oxidized ore or change the plan, taking into account the existing ore stocks according to the facility feeding / sales need,
- Possibility of being in a “penalized” state or as a silicified ore,
- As required by sampling with the help of lever, crusher and drilling rig,
drilling requests from existing or soon-to-be-opened galleries,
It should be questioned, and if any of these elements are relevant for the progress of each level or gallery, it should be discussed at the meeting. If possible, decisions on these issues are taken at the meeting, or mining geologists inform everyone concerned in writing by the next morning of the meeting day at the latest. It would be beneficial to record the agenda items as meeting minutes with a designated personnel. A progress plan is drawn up and published in the existing galleries. Accordingly, with the help of the production team that will carry out the execution, the mine geology team selects the required grade control work and implements it properly.
2. Preparing Toolbox
Having the equipment and consumables to be used in all sampling studies in a bag or in a wooden/composite crate loaded in the back of your vehicle will prevent loss of time and rush when the calls suddenly arrives that the area is ready. In addition to your standard safety equipment, this crate should include:
Map (form) of a previously made or existing face, (See Underground Mapping)
Geologist’s hammer, compass, tape measure (5m is enough), gloves, glasses, first aid kit,
Sample slips (tickets), sample bags, green/pink spray paint, permanent marker, sacks,
Perforated bucket (you can also cut a bucket with a volume of more than 15 liters, e.g. a polymer bucket),
1mx1m or wider membrane or rubber sheet,
Air blower (Leaf blower, compressor), pneumatic crusher.
Bucket, membrane, crusher and blowing machine are optional for relevant samples. In short core drillings, a core cutting machine will also be required, considering the drillhole diameter to be applied.
3. The Team
It is essential that you have a mining geology team to carry out the grade control program and monitor all underground progress to ensure that no mineralization is missed underground. However, in some operations, the ongoing working order may entrust grade control work be carried out by different personnel. If we need to focus on grade control work here, a geologist and at least one assistant (Foreman, Sampler / Spotter) are basically sufficient to carry out the necessary work in the shift. In sampling requiring machinery, drilling/crushing machine operators should also assist the team that will perform the grade control process. At the beginning of the shift, the underground production/excavation shift supervisor and the geologist should exchange information about the faces or sampling areas that are included in the agenda of each underground shift. As you know, being ready in advance for the dynamic process is important in underground works. When the relevant face is ready, communication should be established again and transportation to the area should be ensured without delay. Following the radio announcements of the underground operators who prepare the face will also help the sampler personnel to be ready for work and help you see one step ahead. From this we understand that the fact that all department personnel are familiar with each other’s work helps the work flow quickly and reliably.
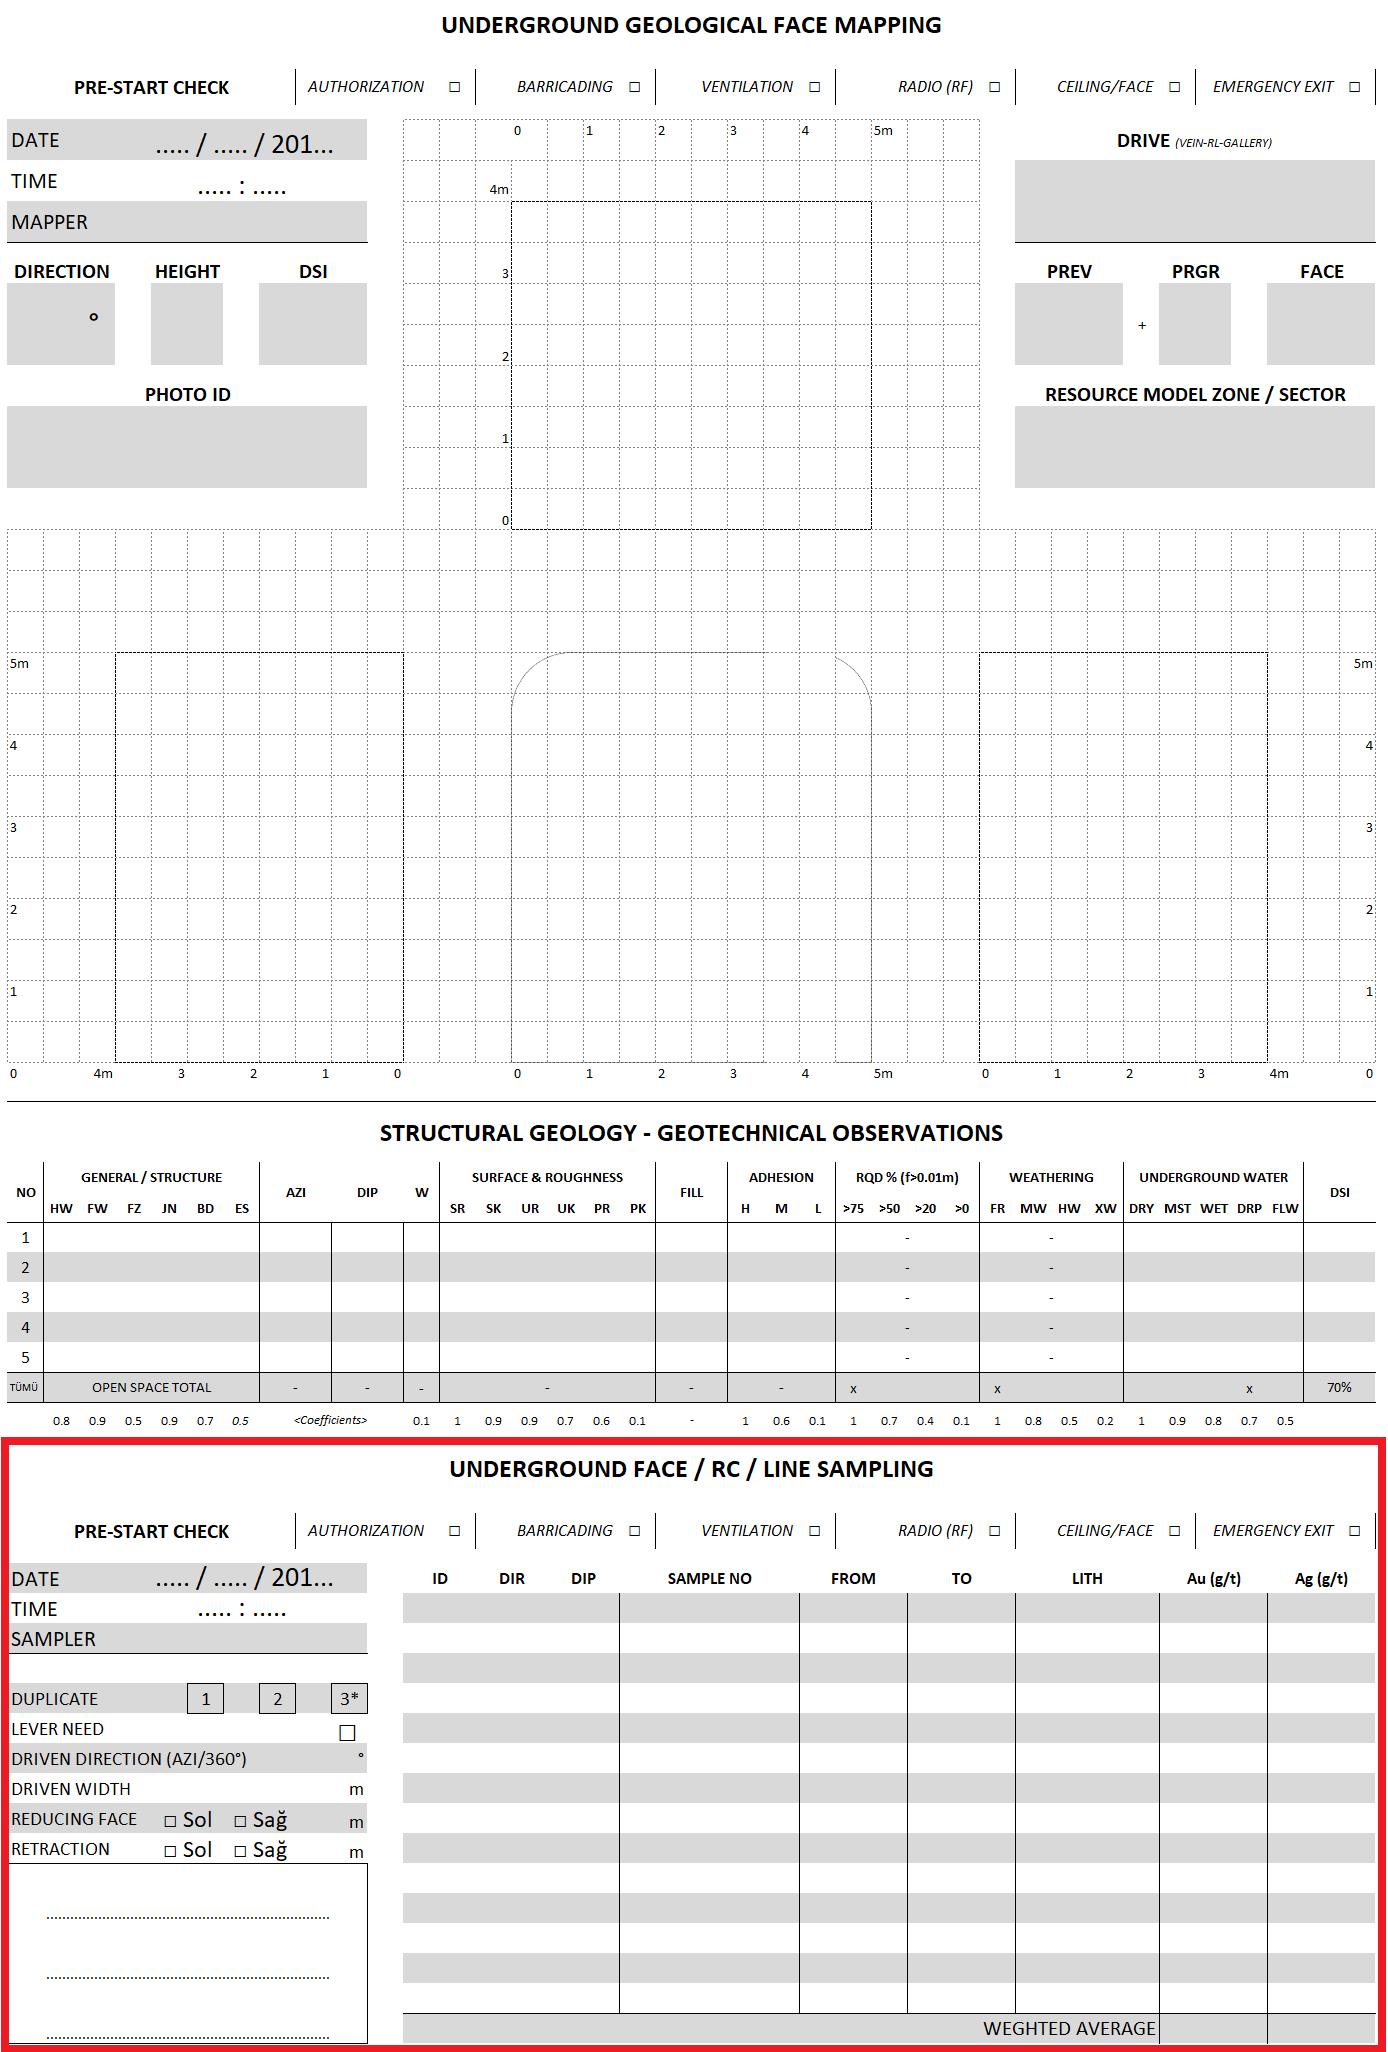
4. Underground Face Mapping and Use for Grade Control
Underground face maps constitute the most important database from which you can control all galleries. Using these maps, you can make geological comments about wherever you need in the underground. For this reason, you must properly perform and archive underground geological mapping. It will be very useful for you to follow the underground face and surface mapping in our related article. If you are going to perform underground grade control, you should determine a standard mapping form. You should design this form to suit your needs and ensure that it is used by your shift geologists.
We will use the information obtained from underground face maps for many samples that constitute underground grade control. We will process operations such as face sampling and “RC” sampling, which will be performed on the face, directly onto the map. In addition, you will decide on all possible production tests on the side walls, roofs and grounds of galleries whose progress has been completed or reached a certain length, based on the mappings. By looking at geological underground face maps, it can be decided to test the walls behind related geological meters where ore bodies are significantly outside the face section (out of progress section). When giving the address here, it is important to remember that geology meters are important, so you should properly take the steps to update the face / drive meters (Geology Meters) on your maps during grade control studies.
Shortly after mapping, the face and walls will be closed to observation due to the fortifications or the effect of underground dust, and will be considered to have been last observed by the “mapper”. Remember, all maps should be made according to standard procedure as if they were produced by a single source, because you will be making big decisions based on maps made by other shifts, maybe years or days ago. It is important for shifts to gain the habit of constantly checking each other and in new situations, all shifts gather together to evaluate the situation and update their standards according to the final decision.
Considering all this, we can conclude that “face mapping is the basis of grade control”. Before moving on to grade control sampling in order of importance and usage, let’s clarify one of the important elements we use to address any place underground.
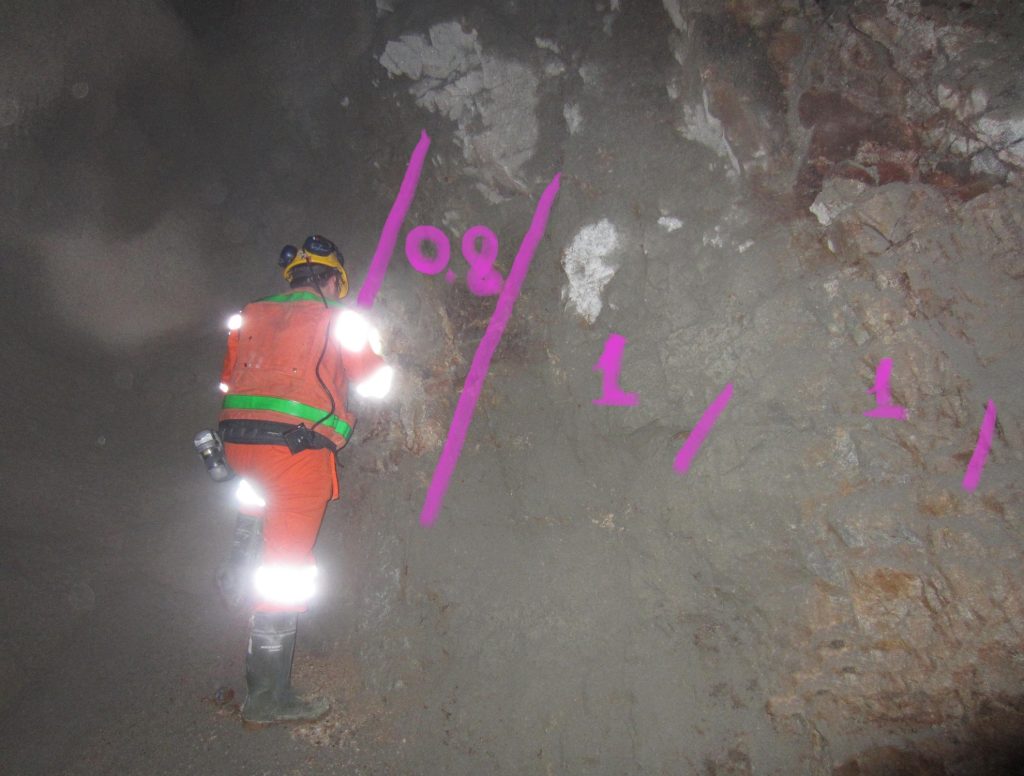
5. What is “Geology Meter”? Marking it on the Wall
“Geology meters” is an important term used by all departments that work underground. You can follow this term in our underground face mapping article under the headings related to determining the gallery name and progress meter. Let’s go over it in a different way here.

- Go to the gallery where the face or wall you’ll be sampling from. Find the meter you can read closest to the face or the location you want to find the address of. If you are entering the gallery for the first time, mark the “+00” meter on the wall where it should be and, if possible, hammer a nail or mark a landmark further back so that it will not be lost due to nearby blasting and make note it there. You can find the criteria for the wall you will choose in the section related to the wall you will follow in the article “underground face mapping”. Since sampling will start from the hanging wall side on faces, select the wall corresponding to the hanging wall side as standard.
- It is beneficial to choose phosphorescent pink color paints for underground concrete fortifications, and phosphorescent green or blue paints for unsupported or dark-colored lithologies. Whatever color you choose with your experience as it is easy to see and follow, dust in the form of flow with ventilation will soon cover them.
- Make sure that the meter reading is above the “+” sign that you can read on the wall you marked before, it is probably dirty and covered. Starting from this point, measure at chest level (1.5m above the floor) up to the face or desired area, piece by piece if necessary. Remember that the measurement you will base on will always be the distance against the wall at chest level.
- Write down the distance you took, either 1.5m above the ground or at the highest point your arm can reach. Sometimes you write extra meters at the highest point your arm can reach, which will come in handy when you come to the same gallery later, as they will be less affected by dust.
- Determine the face name by typing the updated “latest” face footage in your mapping form. Use whole numbers when drawing this meter, rounding if necessary. If the sampling you will do is on any wall, determine the meters you need in the same way, mark them on the wall long before you start the process, and unlike normal, draw a circle around the “+” to imply that the operation will be done on the geology meter.
6. Face Sampling
Face sampling, which is the type of sampling to be done on almost every face of each ore gallery in the grade control program, is essentially a channel sampling at chest level. The logic is the same as line sampling. It will be useful for you to review our article about line sampling. Whether you are a mine geology department personnel or a miner, it is important that you can empathize when performing this sampling underground or, if possible, have it performed by supervisors who have experience in the past. Although it looks quite simple and harmless from the outside, it is a very insidious feature. It is possible that you will experience many invisible dangers in terms of worker health and safety during this job, so you should perform the sampling quickly and accurately, without skipping the procedures, and leave the face as soon as possible. Every minute you waste in the face will bring about the accumulation of teams arriving for the job to be done after you and the extremely unnecessary crowd of mining machines and people. In such an environment, one does not say that an accident is coming.
Let’s examine step by step the necessity of using face sampling in different types of mines, the execution steps and how the results will be used.
6.1. When and How Frequently is Face Sampling Done?
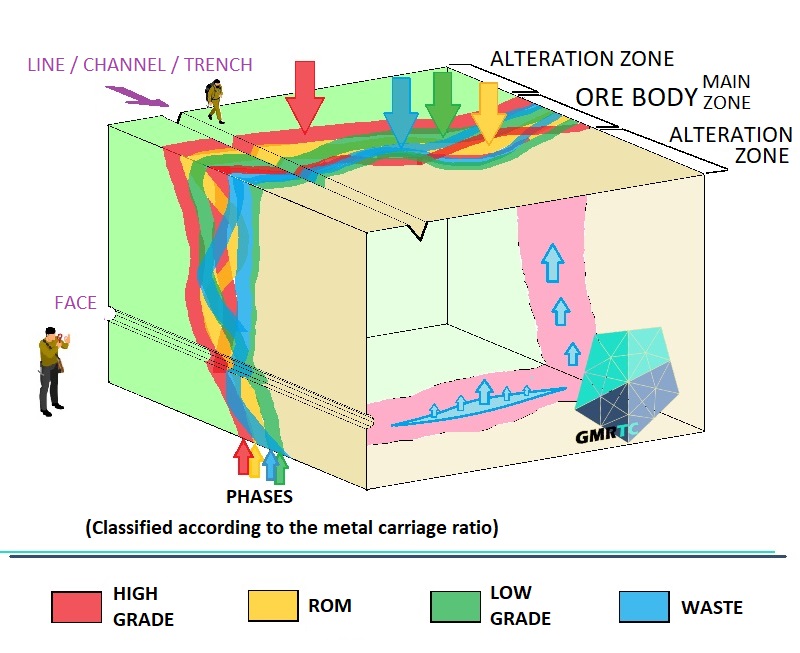
Depending on the methods used in the operation, the underground unit progress length and section vary. The “grade control program” can be applied to fully mechanized “drill and blast” progresses of 6×6 meters sections of 4 meters progress, whereas to relatively short progresses with selective sections of 3×3 meters even. The determining factor in this regard is the type of mineralization and your budget. You don’t have to sample every face. Depending on your mine operation plans, you can choose a periodic sampling program that will provide you with advantages in terms of time and cost. While doing this, you need to analyze your ore features and examine your production program. For example, if you are working on a level whose upper and lower levels both have been sampled, the grade changes may not statistically fluctuate above a certain level according to your samples, and your ore body may be formed homogeneously due to its geological origin. In such cases, you can quickly perform your level production at the desired progress length and evaluate the underground production measurements (solid volumes, “wireframes”) of the stock piles you have created directly on your current model and give the stockpile grade. Or, it is possible to assign grades for the “ground scrapes, roof excavation, inter-level or ground stopes” type productions you will make by calculating them directly on your model. Likewise, with the help of face maps, you can fill the existing gallery and decide on the side gallery entrances and pockets (loading, pump, material, magazine, etc.) in the places you will obtain from the model. Depending on your underground mine plan, you can sometimes perform development drillings from preparation galleries designed longitudinally parallel to the ore, update the model, apply the grade assignment directly to production, and even give progress directions according to this model. It is very important to take the solid volume to be obtained with the underground gallery or open space offset / 3D production map / progress point cloud, as you will perform the calculations on the model with this solid volume. The importance of knowing the ore settings and having experience on the type of mineralization emerges once again. Determining your strategy with expert opinion will not only reduce costs and save time, but will also make it easier for you to feed process plant and sale with more realistic figures.
6.2. Sampling The Face
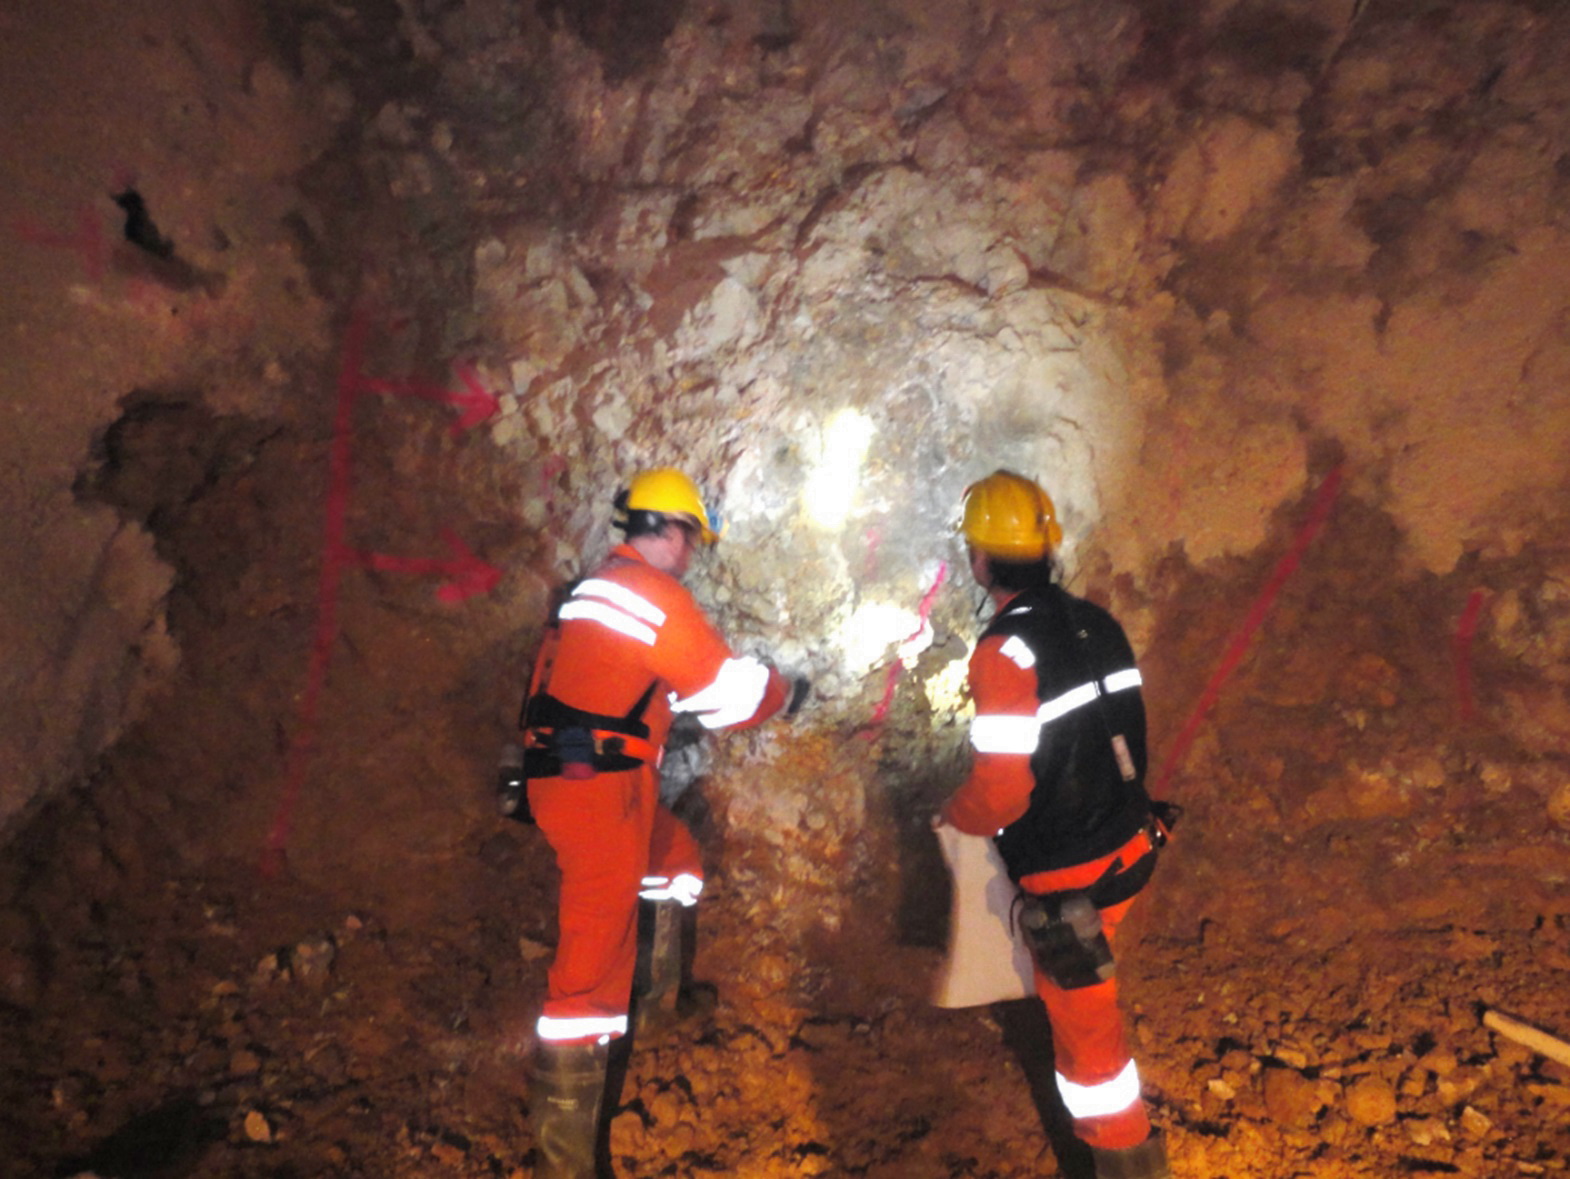
When you arrive at the face, carry out the grade control pre-start checks and have a short consultation with your assistant. Evaluate the conditions of the face, discuss structural problems such as the chamfer on the face being at the opposite angle, the material on the face being loose, the presence of loose blocks with large fractures, with the production shift engineer at the face. If possible, eliminate the dangers with the work machine or manually (with a scraping bar). If ground conditions still pose a danger in terms of occupational safety, consistent with the standards you have accepted, do not perform face sampling and report it to the production shift supervisor, photograph and report any disputes in order to resolve them in the future. If there will be no significant loss of time before face sampling, you can get help from the mobile drilling rig / jumbo on the face to create breakable surfaces, or you can request practical solutions to eliminate dangerous protrusions.
As soon as you get to the face, clarify your task distribution with your assistant / sampler. Clarify in advance who will pick up which equipment or consumables, and who will bring them back at the end of the sample. As mentioned above, you need to be fast and clear. Before facing the face, the geologist should examine the face map and clarify which element to find where, as the face may be too obscured to be seen due to dust or fortifications. Let’s proceed one by one for a general process.
- Whether you reach the face by vehicle or on foot, you will have your materials in your tool bag or in the truck bed. First of all, since the geologist will determine the sampling intervals, he takes the face map, hammer and spray paint and moves to the face. Meanwhile, the sampler takes the sample bags and gloves, and if there are other personnel at the face, he quickly pulls the tape to measure face progress meter.
- If you are going to do the sampling with the help of a lever (bucket basket, crane, bobcat, jcb, manitou, etc.) diagonally from the ceiling of the face to the bottom corner, plan your work in advance according to your conditions by reading all the steps. If possible, while on the ground, draw the sample line with spray paint as far as your arm can reach, the operator follows the continuation of this line. It will lift you up. As soon as you get to the lift basket, choose the only person who will communicate with the operator who will manage the lift. It is important that no one other than the geologist or sampler communicates.
- Clarify your sign language method with the operator. Remember that the operator may make sudden movements while on the lever; hold on to something. Make sure that the areas you hold on to are safe, and determine in advance the areas where the basket will rest or rub against the face. If possible, write detailed instructions for the leverage in your business that you will use in the sampling and follow it strictly. Afterwards, you can follow the normal face sampling steps.
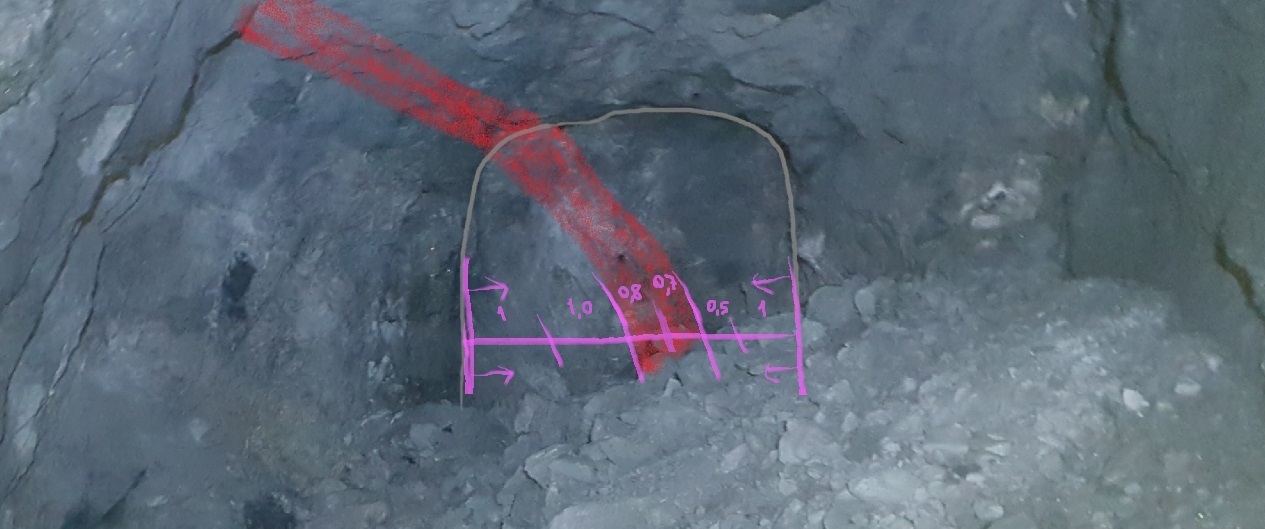
- The geologist, who has mastered the face by looking at the map beforehand, makes the necessary divisions in the face in order of priority. First, he draws the visible ore boundaries, footwall and hanging wall boundaries with spray paint. It then draws faults or textural and phase separations. The sampler holds the stationary tip at the beginning of the meter (“0”) against the wall at the chest level, at the point where the face meets the wall on the hanging wall side, while the geologist, with spray paint in his hand, determines the sample intervals respectively by going towards the footwall side. If there is a statement on the mapping form stating that it is time to take a “duplicate sample”, inform sampler / assistant about this. The interval lenghts can be written above the line with spray paint where the sample will be taken, so as not to forget it when making the grade control log.
- Your mineralization type and budget will come into play when determining spacing standards. As an example scenario, for a vein-type gold mine, your sampling should be as detailed as possible, especially for the production declaration in the information reports of companies open to “Public Offer” on market. For this scenario, geologists draw the line with spray paint at the intervals they deem appropriate, with a maximum of 1.3 meters, a minimum of 0.3 and an optimum of 1 meter.
- As another scenario, you can sample a single all along face for a 5 meter wide massive sulphide or a homogeneous stockwork copper, lead and zinc mineralization. Of course, your mineralization experiences and expert opinion will determine the best choice between two opposing scenarios. In this respect, it would be very useful to consult an expert to manage cost reduction and acceleration practices.
- After making the division, the sampler puts on his transparent glasses, his gloves, takes geo’s hammer; the geologist holds all the bags lined up in his hand, and goes to the beginning of the first sample range, starting from the hanging wall side. The geologist stands on the sampler’s indicated side, constantly checking both the sample and the face surface. In general, the right-handed sampler prefers the bag to be on his left.
- Here, as a geologist and sampler, make sure that samples are taken continuously along the linear line corresponding to the sample interval. Make sure that the sample you take is at least around 3 kg. For this reason, fill the bag with the smallest pieces possible from multiple points along the gap line. If you are just starting out, you can gain visual experience by weighing the pieces you put in the bag in your spare time.
- During sampling, the sampler being closer to the face, constantly focusing on the hammer, and in a position that requires physical effort may cause distraction. Here, the geologist should both watch for the dangers that may come from the upper part of the face and, since geologist can see the big picture, should show the sampler substitution points around the sample line where samples can be taken more easily. Substitute sample areas are not vertically upper-lower points of the line, but lower-upper sections parallel to the floor or hanging wall boundary.
- Sample bags are filled, and all samples are left on the floor in front of the section representing the intervals to be counted and collected later. The sampler or geologist keeps in mind and confirms the number of samples he takes for transport.
- With the help of the interval measurements written on the face, the geologist records the meter intervals on the underground mapping form, the corresponding sample numbers, lithology and other records, if any, into the relevant table on the form. Geologist measures the sampling direction and dip with a compass and enters it on the form. The direction value is important here (not the direction), during compass measurement your back should be facing the side where you took the first sample.
- At this time, sampler can record the sample intervals on the ticket slips and arrange the equipments around. If you are planning to use quality assurance elements such as duplicate samples, standard samples, blank samples, remind sampler of this.
- The team’s knowledge of each other and communication standards are very important here; resting after exertion and mutual understanding in a high pulse and humid environment are of great importance. When lifting samples from the ground, do not neglect the experiences you have gained from occupational safety topics such as “manual lifting” by kneeling if necessary. Do not try to lift more than you can carry. Collect all the materials you brought as shared in the beginning and carry them to the vehicle or safe area, confirming with a standard communication.
As a geologist or occupational safety personnel, taking samples with a hammer in order to empathize will be very useful in terms of being aware of the dangers.
6.3. Direct (Give Direction-Width to) Drive / Progress at Face
Constantly check the direction to be given to the face on the face maps and on the model in your 3D design program. Providing this follow-up shows your commitment and command of your job. Take small notes on the map forms and record in which direction and at what width the face should progress. If a shift geologist does these things, it will pave the way for all shifts. Trust and reassure your shift mate. Generally the ore body is skimmed off along the footwall on all levels and is operated by following the footwall contact measurement. By examining your exploration drillholes and resource model, you can follow the footwall from within if the mass on the side close to the footwall contact is low grade. The important point in this pursuit is to aim to get the highest grade range at the optimum level in the longest diagonal strip within the face section. This is where the art and experience of the geologist comes into play, so you should always have a mindset and foresight forward further of the mine planning and production team.
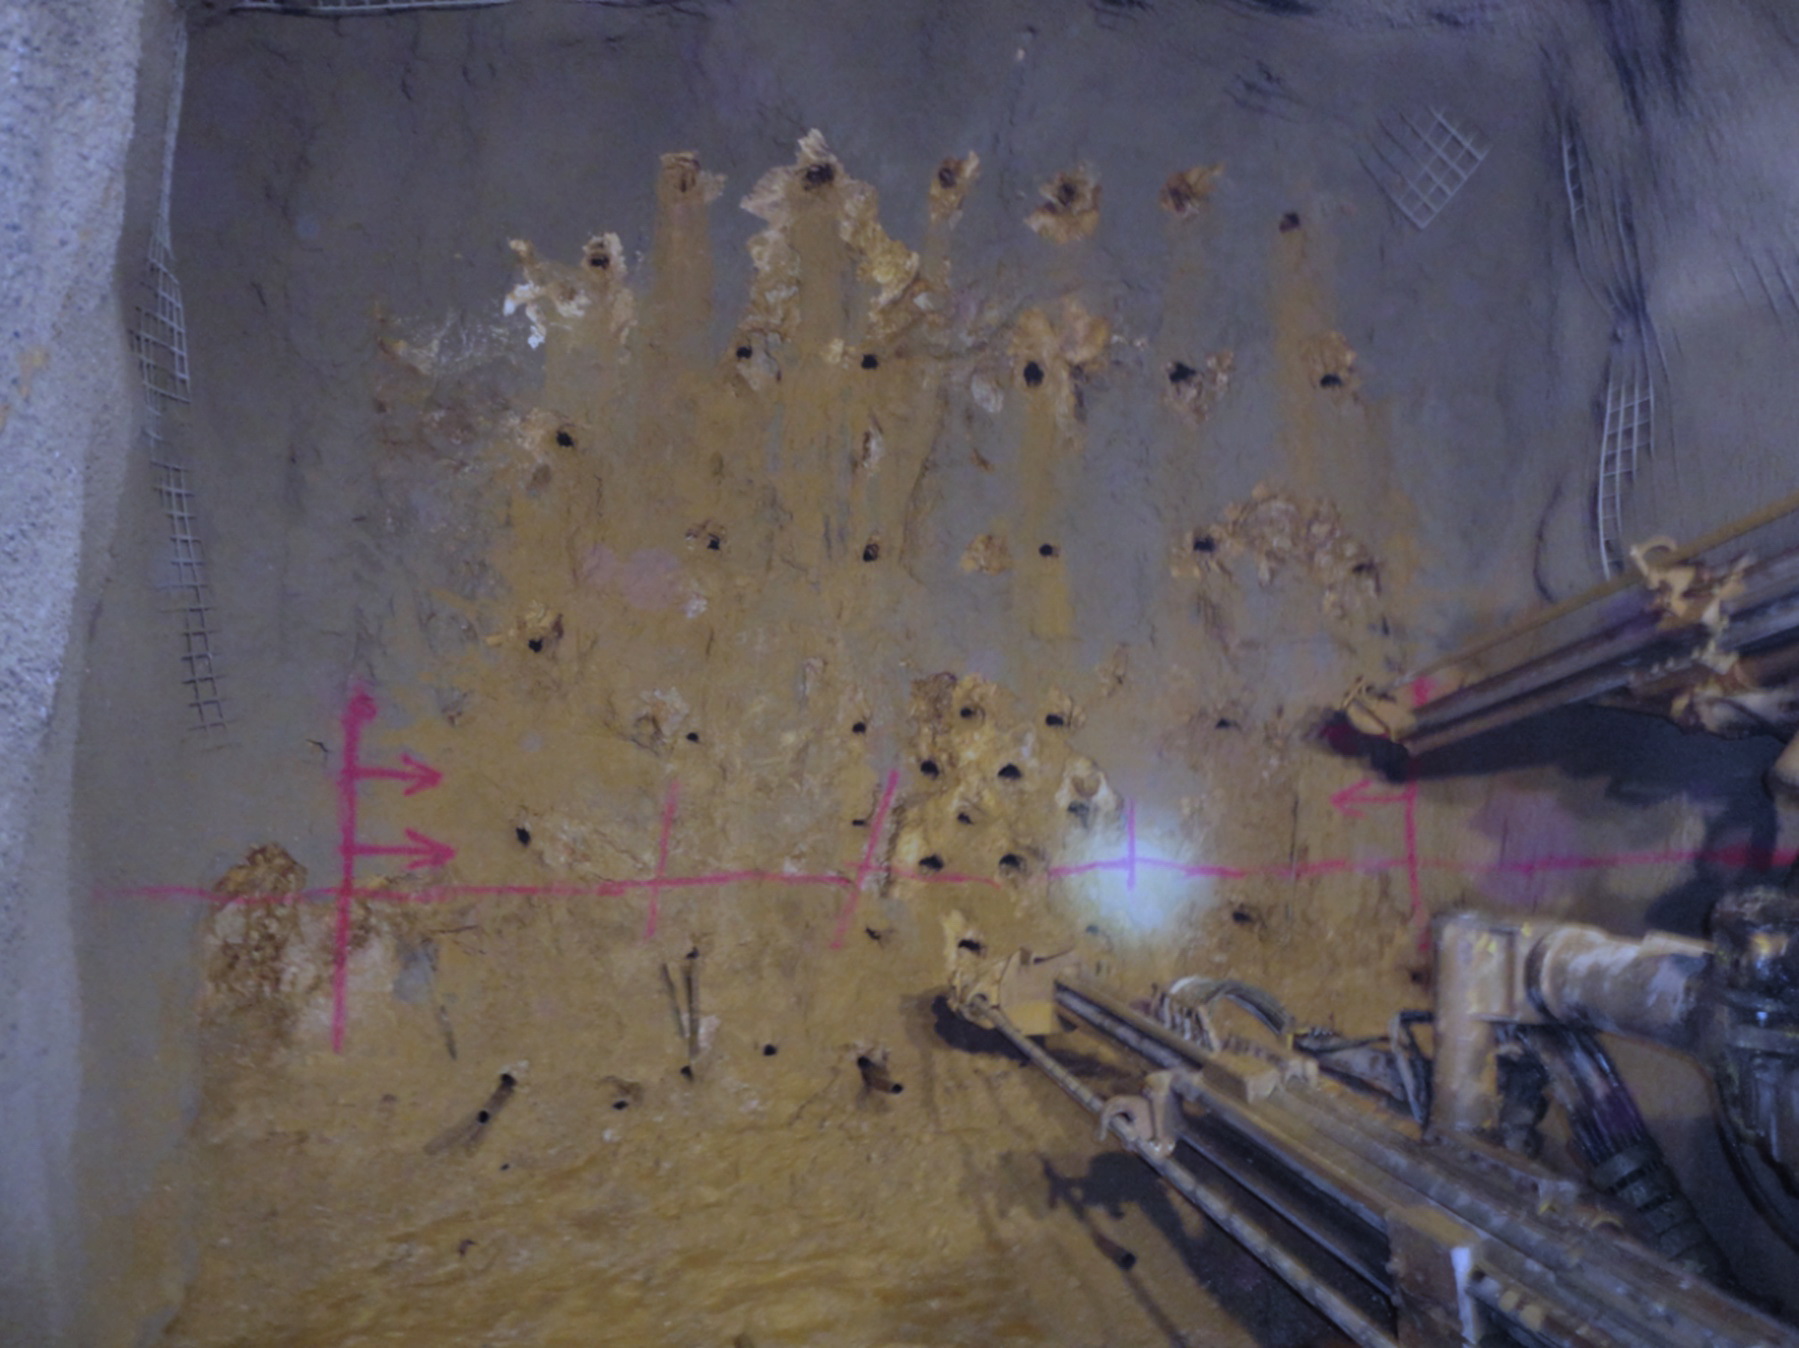
If the face is to be drilled immediately after completing the sampling, be careful not to keep work machines close to the face. These machines, which have tons of iron piles, may cause your compass to be wrong. Ask sampler to take 2 rock chips and draw the direction you will give with spray paint. Move to the center point in front of the face, find a flat/horizontal surface or dig. Place the first rock chip close to the face, ask your assistant to place the second rock chip by pointing in the direction you will give accordingly. If possible, the distance between these two rock chips or two points should be more than 1 meter. Paint the tops of the rock chips with spray paint and draw a line between them. If possible, inform the production shift manager and ask the operator to drill a hole in this direction. Place a rod or rod into the first sample hole to be drilled and ensure that the operator drills the other holes by looking in that direction easily, as the direction you have drilled into the ground will soon disappear during drilling.
Specify the width (section) of the face progression you want to form with a vertical line on the face or walls from the highest level your arm can reach to the lowest, mark it with arrows pointing into the section you want. If you want to rotate the face by pulling it back on a wall, mark the width on the wall in the same way and inform the operator. Carry out special situations such as ceiling height reduction, selective narrow progress/blasting or special situations that you discussed at the weekly production meeting, in consultation with the production shift supervisor at the face. Record all your transactions on your form with date and time, and take short notes.
Aim to apply optimum width on levels where the ore body does not elabpse into single gallery section. Bring up such issues that you have encountered on other levels and that you can predict by examining the ore model, in production meetings. Similarly, if you want to enter an ore drift/gallery, you can determine this by looking at the face maps of cross-cuts or other non-ore drifts.
6.4. Deliver Samples and Complete Office Work
When you arrive at the office, immediately complete your entries in the sample record files where you keep records of all grade control samples and the “GC Log” files where you keep the log record of the sampling. Confirm with sampler by looking at these files and adding the quality assurance and quality control samples (QA/QC) to be added. The sampler personnel must complete the entries in the sample book with the relevant ticket slips, print out the submission form without delay, deliver the samples to the laboratory or cargo, take the delivery signatures and place the delivery document in the relevant folder in the office.
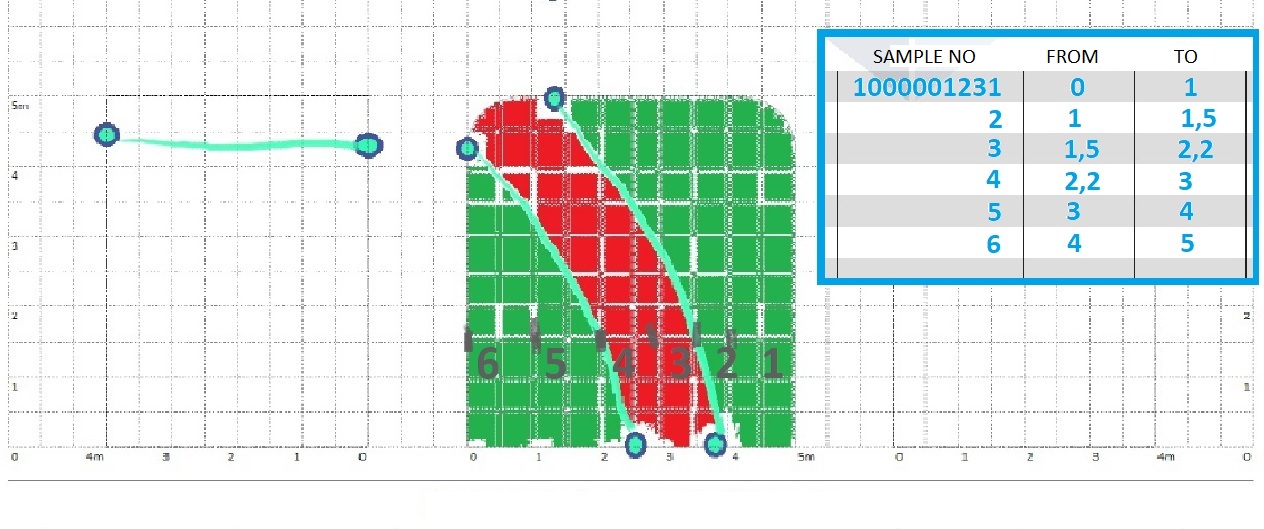
The geologist must immediately enter the grade control log of the sampling in an error-free and clean file format. The purpose here is to enable you to quickly see all the samples in your 3D design program by copying and pasting them without manually editing the sample when the analysis results receiving. Columns for the samples include “sampling face id/name, start of the sample range (From), end of the sample range (To), sample number, your commodities, lithology, line start coordinates (X, Y, Z), line direction, line dip angle, sampling date” and other titles you specify.
Analysis result data, sample interval values, sample numbers, coordinates, direction and dip values should be kept as “numerical” in all your relevant files, otherwise there will be problems in importing them into 3D design programs and it will cause loss of time. Before starting the project, an arrangement is required so that it can be used jointly on all computers, without exception, on which the project will be used. In your operating system, set the value “region options (Additional options)> number options> decimal symbol” to “ . It would be useful to make a “dot”. Do not forget cross-checking in your table files such as Excel. Separate the decimal values you enter into the cells with dots and perform basic maths to verify them. Opening and saving your data files on a computer that does not have this application may disrupt your entire system, be careful. Likewise, your reporting files and macro files. Since it will work in this system, it would be beneficial for you to familiarize yourself with this format, after setting this order only once at the beginning of the project, it will not require any additional action. If you wish, you can use a standard comma, but it is very likely that problems will arise in the future.

If you are keeping large-sized level maps (A0 or A1 size) for practicality after face sampling, do not forget to add the final lithology and structural data on the level map containing your drillholes and model section after sampling.
6.5. Assign Grade to Production After Receiving Face Sampling Results
Never “manually” enter analysis results when you receive, just copy-paste them. If possible, request the laboratory to send them in a table file in the format you want. First, check the quality assurance samples, generally verify whether the standard samples remain within the 10% margin of deviation, if the limits are exceeded, send a new standard sample and request the entire sample group to be reprocessed. Enter all your standard, duplicate and blank results in your quality assurance file, these are your quality statistics and represent your sampling health. If the entire preliminary procedure has been completed, copy and paste the analysis results corresponding to the relevant columns into your grade control log (GC Log) file. Write down the results corresponding to the sample numbers on the mapping form using a pencil, take the weighted average of the face (sampling intervals weighted) and note it down and determine the average grade in the face.
Mine surveyors (survey) can go down to the galleries and measure / get the coordinates of the progress face meters mark up while getting gallery offsets in 3D. You can have it done by survey personnel, accompanied by a sampler, or by giving or showing the geology meters that are requested to be measured weekly or daily in the period you determine. Or, measure the head-of-line coordinates from the directions and widths on your face maps in your 3D design program and process them by temporarily adding a note until you make them measured by survey personnel.
When the results of samples recieved, update the model quickly if possible, if not possible, enter the face grade you calculated by your spreadsheet file that you keep organized. If you need to get the arithmetic average with the previous face grade, update the previous face grade in this way retroactively. If you use the face average as a standard to represent progress of usual stockpiling, assign this directly. You can use many standards to calculate the average grade for underground progression. If the feed direction and width you gave are not correct, you may need to apply discrepancy / waste contamination factor on the face grade. Using all these factors, determine the grade of progress with confidence. If you are not sure, wait for the sampling result of the next face or decide on “dump sampling”. Determine the face progress grade with an interpretation of model data, sampling data and all geological information and progress section dimensions. If you are sure, record the final grade you have determined in your underground haul truck tonnage / numbers file that you use jointly with the mining / production department. Then, without wasting any time, inform sampler to direct the material waiting in the intermediate stock to the relevant stockpiles in the main stock area. You can do this by making notes on the sketch that is constantly being edited on a blackboard where the entire geology department can see it.
If the progress face does not go in the direction and width you specified due to the production you follow, if there is unwanted rise of the roof or if the ore is narrowed in the next face, or if the ore mass is undesirably containing waste rock more then expected, apply a contamination factor on the grade you assign as you see it. Do this with as much analytical thinking as possible and add it in detail to the relevant cells or lines as a comment. These explanations will help you feel confident and give confidence to other departments in case of disputes that may arise later. If necessary, report these situations, put them into correspondence and inform the relevant people.
Giving a grade means a kind of valuation; for this, in addition to the comparison and experience of the final product, the underground excavation space must be mapped very well. Experienced geologists should perform this work in shifts and be clear. The geologist’s interpretation is essential and all interpretations are closed when the final grade is given. For this reason, in order to demonstrate this stance, the entire business chain must be healthy and the grade control work must be carried out with maximum discipline.
7. Wall Sampling
Defining the term of surface where the side walls of underground galleries meet the ground vary too much, as we will use “wall” to identify in this article. If your operation is progressing with full fortification, you need to perform “wall sampling” retroactively after the ongoing progress in order to sample the side wall bottoms. Wall samples are sometimes completed in parts and sometimes all at once, and the wall bottoms are re-supported and fortificated without wasting time for job safety purposes.
7.1. When and How Frequently is Wall Sampling Done?
During the development of preparation galleries, ore bodies can be come accross vertically or at an angle, within or outside the plan. The intersected ore bodies are drawn in face maps and the valuable part of the ore body is clarified by retrospectively sampling in these regions. It is especially important to carry out planned wall samplings at perpendicular entrances to the ore body, because you should determine the entrances of your ore galleries according to the results of these samples. For this reason, you should decide on wall sampling in the preparation galleries (Cross-cut, XC), in addition to wall sampling in unplanned ore entrances during underground progress, you can also get help from drillholes and other types of drilling activities to clarify the ore body position.
7.2. Prepare the Sampling Field/Section for Wall Sampling
Since wall sampling will be performed from the gallery side wall bottoms, as the name suggests, if it is covered with fortifications or concrete, it should be opened with a digger / hammer backhoe at reliable heights, under the supervision of the underground production shift engineer. While doing this, the base is dug up to a height of 1 meter from the point where the wall and the ground meet. Fortification or shotcrete should be applied immediately after sampling if needed.
7.3. Sample The Wall (Legs)
Sampling is performed with the same instructions as in line, channel sampling, and even face sampling. If possible, you should start the sample from hanging wall side, starting the sample a few meters before the entrance to the ore body and continuing until a few meters after the ore exit. Use the same procedure for dividing sample intervals and sampling as in face sampling, but design a special form for wall sampling and draw and enter your sampling data into this form as scaled as possible. Gather the data, “sample intervals (From-To), sample numbers, lithology, sampling direction and dip of the interval lines” transfer it to digital media.
(CS: Channel start, CE: Channel End, SS: Sample Start, ES: End of Sample)

7.4. Deliver Samples and Complete Office Work
After adding the required QA/QC samples and delivering them to the laboratory, as in the face sampling procedure, enter data into the “GC Log” files under the server, as in face sampling. Here, use a format as the sampling name (ID, BHID or CHID) that indicates from which gallery the wall bottom sampling was done, as well as between which meters. For example, if the wall bottom samples were taken between 30 and 45 meters from the left wall in the A500 gallery, you can use a nomenclature such as “A500XC+30_45L”. By looking at this nomenclature or seeing it on the form, subsequent shifts on the same wall can continue the sampling process with a different name until the required area without leaving any gaps (For example “A500XC+45_50L”).
7.5. Give Drift Entry Bounds by Evaluating the Wall Sampling Results
When the sample analysis results received, without wasting any time, examine the face maps made in the region again, take into account the dip of ore body and note the most suitable entrance meters to place the highest grade diagonally at the ore gallery entrance section. Keep the geology meters for the designated “ore gallery entrance” from the right and left walls in the vertical cutting preparation (Cross-cut, XC) gallery in your shift clipboard to mark up on site when the production team requests these entries from you. If you are planning to produce pockets or galleries from wall samples made in places where unplanned ore body is intersected, make a similar decision by examining the underground face maps and your model and note the necessary geology meters.
8. Short Drill (RC / Sludgehole / Mud) Sampling
In order to test the ore bodies behind the faces and walls in the ore galleries, sampling can be done with the help of mobile drilling rigs (jumbo, simba, etc. with familiar names from the brands) that are relatively practical to the use of drilling rigs. Although these drilling rigs can sometimes reach lengths of over 20 meters with their inserted rods, it is essential that this method be performed carefully, as there is less confidence in where the detrital mud material regularly comes from in the hole. Otherwise, by sampling the sediment coming from a vein that is a few centimeters thick and concluding that it is meters thick, this may cause a decision to be made in a pocket or gallery that should not be entered in the planning.
8.1. When and How Frequently is “RC” Done?
“RC” (Reverse circulation) crumbs and sludge sampling, which you will use when you are not sure or want to get information to see behind walls and faces, or when you need to enter the ore body at a certain angle, is generally used for 3 different purposes and processes.
- In underground ore galleries, on levels where the ore body does not enter a single gallery section, you can plan “RC” tests to test the grade of the mass in sections where it is determined that the mass is large enough for production by making use of face mapping. You can put these on the agenda in production meetings and carry out sampling with operators and rigs that the production team will assign at their own time.
- While the cross-cutting galleries (XC) progressing, when you approach the ore, you can sample from the blast holes or in the desired direction and dip while the rig is ready at face.
- You can sample from the ceiling / roof holes for inter-level stope production or roof blasting.
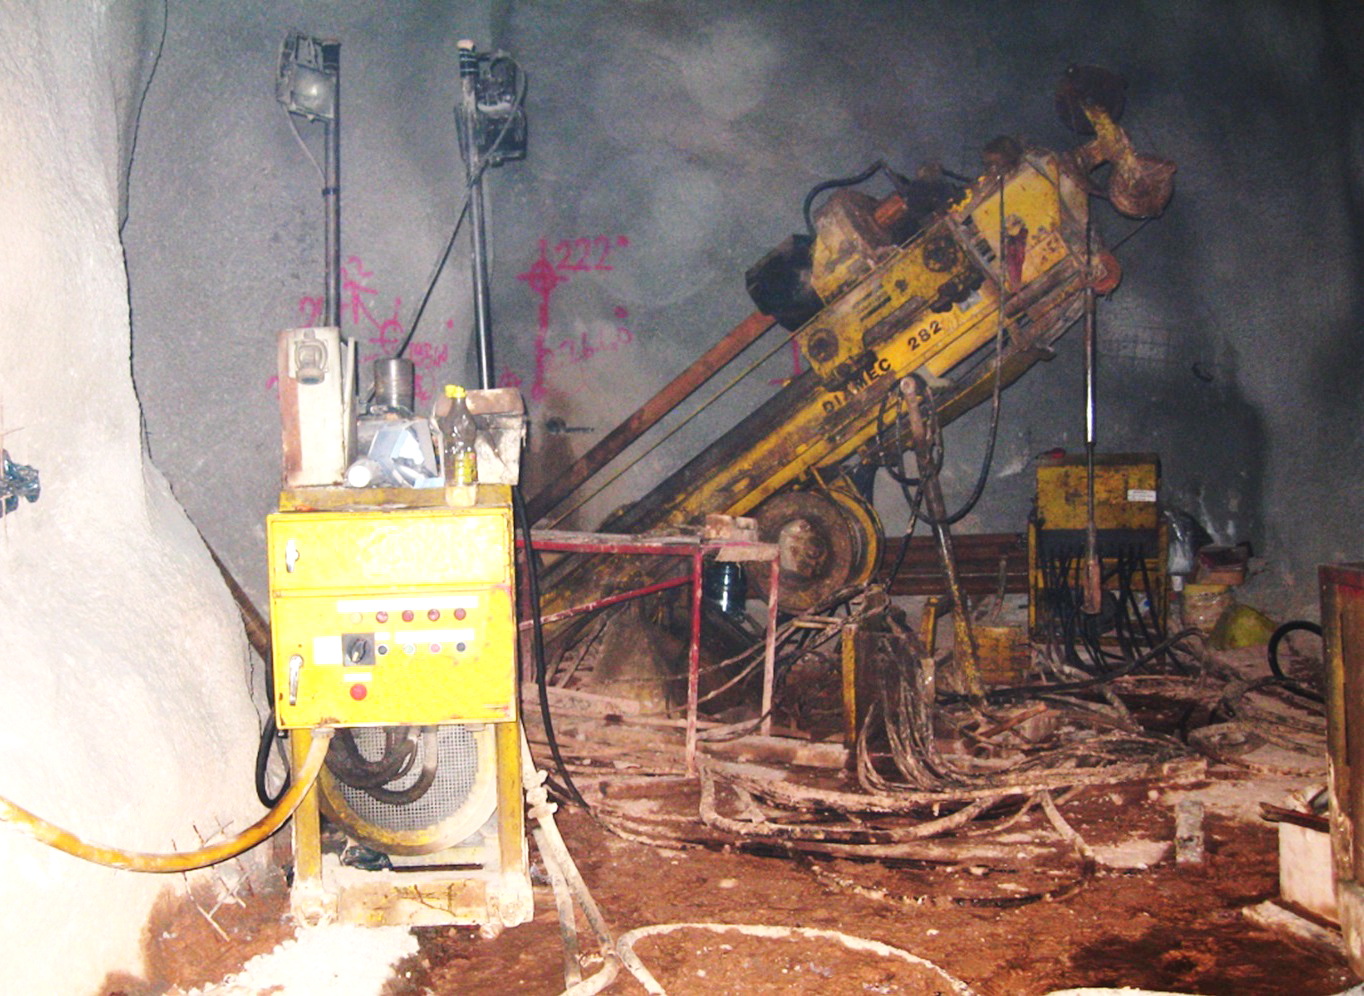
8.2. Plan Drillholes (Locations, Directions/Inclination) and Start Drilling
For the drilling to be done on the side walls and ceiling, digitally examine the face maps thoroughly before the end of the gallery and note down the measurements you deem necessary depending on the location of the ore body. Examine the level from the model and exploration drillholes and confirm the meters you have determined. In the underground, where intense work flow continues, the large number of drillhole plans requires certain planning in execution. In addition, it will be useful to take samples from the blast holes, 2 or more (2m + 2m, per half rod entry), in the vertical cut galleries entered before the ore galleries. In general, it would be more beneficial to approach the main direction (and dip) of the ore body at an angle greater than a certain amount (approximately >45°) or if you are passing through the ore body at a similar angle, it would be more beneficial to sample by drilling in the face rather than face sampling. Here, as narrow space conditions and rig booms (rod, tower) allow, aim to drill as steeply as possible to the ore dip, and note any exceptions or situations to be considered on the paper on which you write the measurements. Before the rig arrives, mark up the geology meters you planned on the wall (circle around “+” and the phrase “RC”) so that the operator can easily see them and put the vehicle in suitable parking positions without asking.
8.3. Sample the Drillholes (RC) in the Ceiling or Side Walls
Our basic logic is to take the fine material that the drill (Rock bit) breaks and crumbles in order to drill in the determined length, into the bucket from the collar of drillhole through the reverse circulation of mud / water, wait for the material to sink, remove clear water, and obtain a homogeneous sample to represent the drill in length. If you are doing this on a face, draw the sketch in the face mapping and enter the grade control log in the relevant section of the form. In order to keep a record of other types of drilling sampling you will do underground, prepare a form with “RC name – gallery meter, sampled sludge-hole progress meters, lithology, drilling direction/dip” and other headings you want.
Place your perforated bucket in the direction of the flow of the crumbly mud material returning from the hole with the reverse water circulation during drilling at the drillhole collar. Before drilling under the mud flowing at a certain angle and pressure, place the bucket by observing your job safety procedures and wait at a safe distance / area away from moving equipment until the rig stops drilling. Since the environment will be quite noisy, tell the operator your preferred lenght of sampling before you begin. Generally, the length of 1 rod for jumbos is approximately approximately 4 meters and the sampling standard can be determined as 2m+2m. Based on this example, when taking 2 pieces of samples in the same hole, it is very important that the operator is informed about this sample taking in advance. When the operator completes the first 2 meters of drilling in the hole, he should stop the progress (pressure) and take out all the sediment belonging to the first 2 meters of your choice by pumping water and rotation. When you see that the water has become clear, you can indicate to the operator with sign language that it is sufficient. When the machine stops, only the sampler goes to the side of the bucket, drains the excess water by tilting the bucket slightly and carries it to the safe area behind the drilling rig. Sampler mixes the clastic material in the bucket with thick gloves, or pours it on a suitable ground, and pours around 3 kg of homogeneous sample into the bag under the supervision of a geologist, without allowing it to mix with other rocks on the ground, to represent the progress. Meanwhile, the geologist takes a section of the sediment, examines its content, and records elements such as sample number, drilled interval, and lithology in the form. Make direction and dip measurements at a convenient time when all the sampling in the gallery is completed and the elements that will affect the rig and the compass have moved away. If necessary, place a rod or any pipe in the holes and record the direction and dip values of the “RC” drillholes you sampled on your form. If a work machine is operating in the face, measure the dip value, go behind the machine and measure the drilling direction as close to reality as possible from a far distance.
8.4. Deliver Samples and Complete Office Work
After adding the required QA/QC samples and sending them to the laboratory, as in the previous samples, complete the data entries in the “GC Log” files under the server, as in the face samples. Set the “RC” designation as standard and enter it into your grade control log file (ID, BHID or CHID). For example, you can use a naming such as “A500N+40LRC” for a sampling you made on the 40th geology meter on the left wall in the A500N gallery, and “A500S+20RRC” for a sampling you made on the 20th geology meter on the right wall in the A500S gallery. You can also name the “RC”s you have made on the face or ceiling similarly and set standards to filter them in the 3D design program and evaluate them easily.
8.5. Evaluating "RC" Sampling Analysis Results
When the drilling results arrive, immediately process the results, convert them into 3D, and then send them to the planning department. Your communication with decision makers on this issue is very important, because the maps and model are your responsibility and only the geology department can indicate what size of mass the positive values obtained from the incoming sample results represent. In other words, it is important for people who have knowledge of the ore body to interpret the possibility that the planned gallery or pocket, or progress, will yield results above the limit grade. If the rock material representing the sampling you have made has been hauled on ore stockpile, you can give its grade by taking into account the sampling result. Of course, it is recommended that you also take other elements into consideration.
9. Development Drilling ( Diamond Drilling / Core Drilling )
Unlike exploration drillingholes, the term “development drillholes” are generally known as result-oriented drillings that are planned on-site and quickly sampled to fill the gap between drillings that are open during operation. It should not be confused with Resource Infill drillings, because ore development drilling aims to obtain more frequent and detailed information than planned drillings to fill the gaps made during the exploration process. In today’s conditions, it is possible and should be preferred to apply exploration drilling procedures such as photographing cores, cutting and storing witness samples. In addition, controlling and monitoring the project with a 3D design program will be more suitable for planning and executing the drillings in the design environment.
If you will not leave a witness sample of development drillings, proceed quickly and perform sampling with the smallest diameter (BQ) if possible. A larger core diameter will increase the unit sample weight, but in case of rough ground, it may be necessary to proceed with thicker diameters. Do not forget to inform your driller of the core diameter you will use as soon as possible, the rig and machine will be prepared and shipped according to this.
9.1. Planning Drillholes and Setting Up The Drill
The constant control you have over your project on your design screen and the proper maintenance of your database will make you feel the importance of this step. Maybe you are currently carrying out the production you planned in your operation in this underground, which was targeted by the drillings of a very costly and arduous drilling program decades ago. The ore body was sliced and slipped with faulting or there is a positive value in a drillhole that passes through a nearby area that you did not plan for. Naturally, you want to test these areas with underground drilling. In the section where a drillhole intersects the ore body, you must have serious reasons or a determination of inconsistency to drill again on or very close to it. Otherwise, we can consider the expense and time you will lose representing the same points as “neglect”. After examining the maps of actual levels and the upper and lower levels and drawing the continuity of structural elements such as faults or mineralization in the 3D design program, make your drillhole plans with lines in the same way, write down the collar coordinates, directions and dips and have them marked in the underground survey personnel or use the pointer yourself. Position the rig with drillers by directing it and start drilling. According to your division of responsibility, follow your drilling instructions, provide the necessary consumables, and constantly monitor the work to keep the core recovery and progress health at a high level.
Have your drilling plans marked on site (by survey personnel) in advance, along with drilling names or temporary numbers before the drilling rig goes down. All drillholes should be marked with “drilling sequence number”, “DRILL” and “DIRECTION”, with at least 2 points on the wall or ground (it is preferable hammer piles or to place rocks and spray-paint them, although it is not healthy). Signs should be standard and should not cause confusion.
Also it would be useful for you to check out “Drillhole Planning For Mineral Exploration” for this topic.
9.2. Log and Sample Drillhole
You do not have to keep the cores if you are in an area where there is a progress waiting for the data you will obtain or where you will terminate the production in a short while. In such cases, quickly examine the core boxes where they are, quickly separate the ore sections such as a face / line sample and sample them after making a log. If you want a witness sample to remain in the core boxes or if you want to reduce the grammage per sample because you are proceeding with a thick diameter, transfer the boxes to surface and cut the cores in the intervals to be sampled. In a single-page drilling log form, you can enter standard values such as from-to measurements of intervals, lithology, sample numbers, drilling entry coordinates, direction, dip, and additionally core recovery (CR%), RQD. Enter values such as . Give sampler the log form you have as a sample list or sample together quickly. The sampler quickly will bag the samples in accordance with the drillhole sampling procedure and stores or disposes of the remaining cores or cases according to instructions.
9.3. Deliver Samples and Complete Office Work
Following the standard QA/QC procedure, while sampler delivers your samples to the laboratory with the sample submission form, you enter the “GC Log” of the drilling into your relevant file. If available, save the drilling photographs in the appropriate place and write the image names according to the format you have determined beforehand.
9.4. Evaluate Drillhole Sampling Results
Copy-paste the results on the file, send the 3D digital version to the underground production planning department and discuss the ore mass you expect. The planning department may see the values and potential as economical or feasible and may want to extend the gallery progress or plan a new gallery. Evaluate this plan and share your ideas, as mentioned under previous topics, geology team should have the most information about ore body and its features.
In your long-term underground planning, by designing access roads or ramps parallel to the ore body, you can plan systematic drillings that will intersects the entire level or levels, complete them quickly and drive the ore galleries directly according to them. According to the model to be created from these drillings, you can mark up the assigned directions by survey department and obtain grade values from the same model. To decide on this type of production, you must evaluate the possibilities of frequent slips (due to faulting) with ore body undulation and young faulting. It is important that you hold meetings with experienced experts in this evaluation, which you will make based on the model you created from your exploration drillholes. Otherwise, you may encounter many unforeseen problems, unnecessary contamination of production materials, and loss of time.
10. Dump Sampling (Heap Sampling)
“Random sampling from haul truck dumps”, which is the least reliable sampling of the grade control program, is generally performed during production as an auxiliary or when other sampling cannot be performed due to important excuses. In addition, you can use it to help assign grades to high-tonnage production such as inter-level stopes / blasts or face progresses wider than expected. It is also possible to benefit from dump sampling for unexpected sudden grade ups and downs or ore body contraction.
10.1. Sample Ore or Potential Dumps
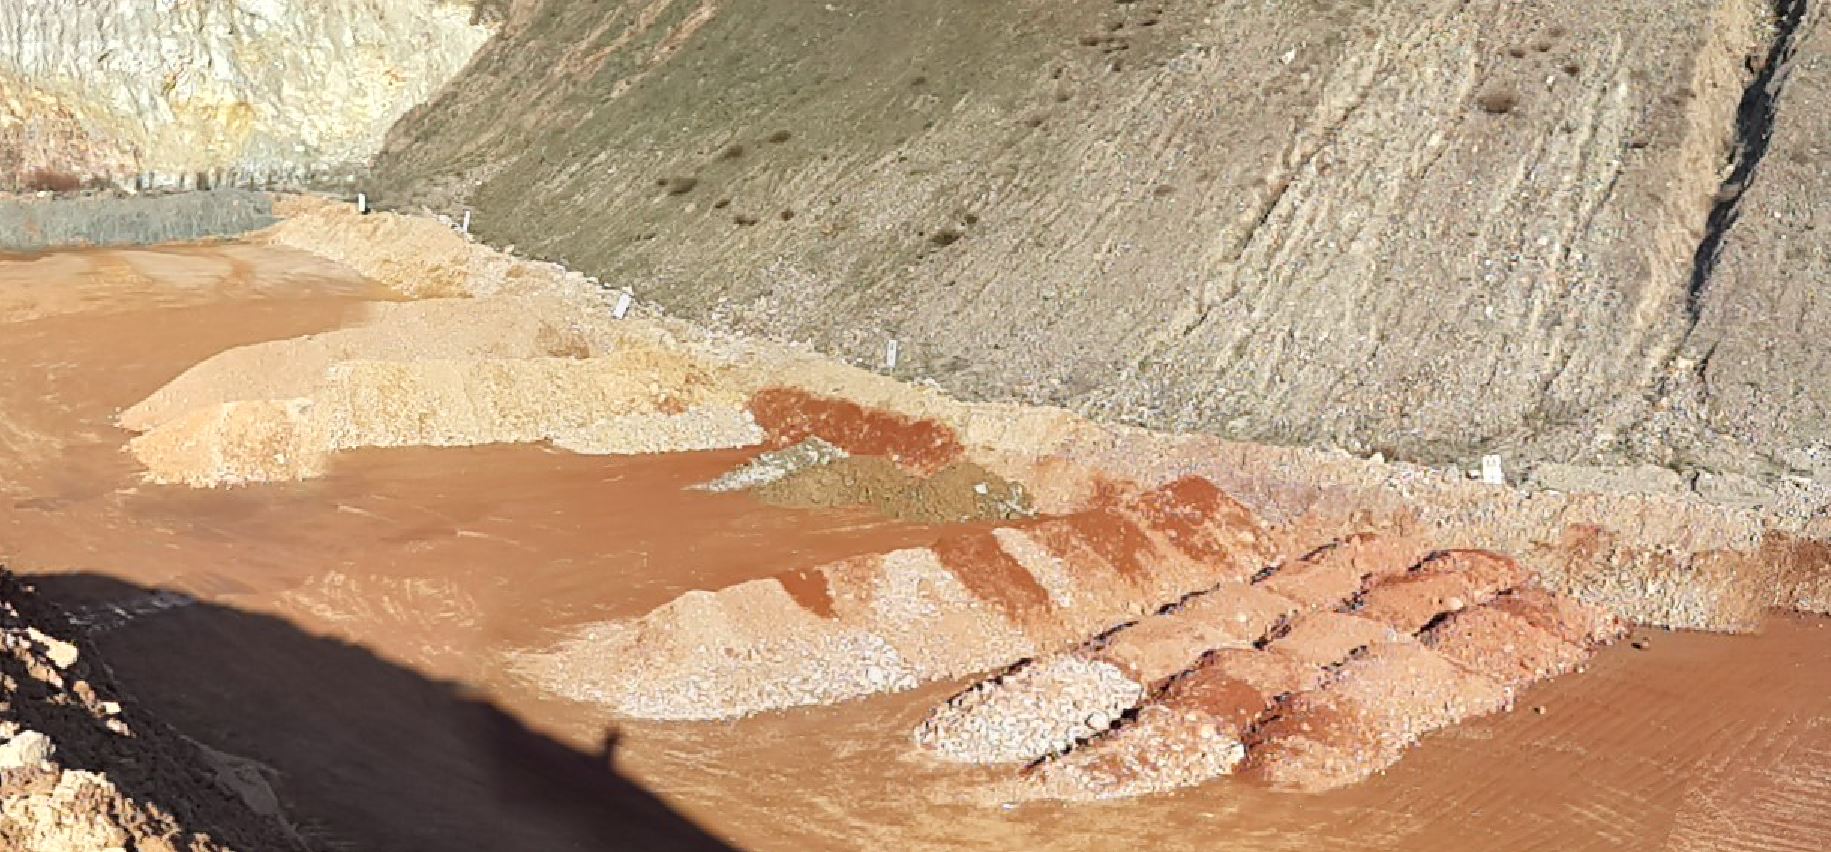
As a geologist, inform the sampling personnel about the material you have decided to sample from the pile. Sampler personnel must go through all the piles equally and fill the sample bags randomly, without any geological, lithological or visual discrimination. While doing this, he uses a shovel made of material that will not affect the element you want as a result of the analysis (plastic or metal nut shovel, depending on the situation) or impact-resistant gloves. If the majority of the material consists of extremely large block sizes, exceptional crushing / hammering operations may be required depending on the situation, but it should not be forgotten that the amount of gravel-sized (~2cm diameter) and silt-containing rocks can be considered as ground in itself, representing the heap in sufficient mixing ratio. Here, general assumptions must again be obtained with your statistical calculations. To give an idea, it is appropriate to buy 5 bags / samples for a mass of 200 tons and fill each bag with 10 handfuls of samples to keep the optimum weight of 3 kg. In other words, we can say that the sampler makes random samples of 300 grams each from at least 50 different points on the batch for a 200-ton dump.
When sampling dump clusters, it needs to be spread out in the smallest clumps possible, so sample the relatively small dumps made by underground haul trucks. After sampling the ore clusters, you can quickly raise and gather the ore masses with a wheel loader to save space in the stockpile area.
10.2. Deliver Samples and Complete Office Work
In this sampling, geologist do not have to accompany sampler. Geologist only checks the samples taken, quickly examines them in terms of lithology, and writes down the dump / face name, sample numbers and lithology data necessary to process in grade control records file. This sampling type doesn’t involve duplicate sampling, if necessary add other QA/QC elements and inform sampler to deliver samples with submission form to laboratory.
10.3. Process Results and Assign Grades
When the analysis results recieved, enter the results of the bulk samples you keep in a file and give the grade by taking the arithmetic average of the element results. If one or more of the samples taken falls outside the average distribution according to your statistical interpretation, do not include it in the arithmetic average and note it. Then, if there are other grade control samples for the ore body in question or the values you calculated from the model, take the arithmetic average of these and your heap sampling result, write down the elements you took into consideration for assignment to the relevant place in your records as comments, process the results, and move the material waiting on site to the stockpiles you have decided on without wasting time.
11. Ground Sampling
Although it is used for inter-level production in the underground grade control procedure or as an alternative to intermittent face sampling, bottom sampling is not preferred due to the need for ground cleaning. Its logic and application are the same as face / line sampling, and this method can be evaluated under special conditions.
12. Moisture Sampling, Swelling Factor, and Specific Gravity Examples
All samples you send to the laboratory will first go into the oven and be dried, so remember that all analysis results you will receive from the laboratory are the ratio of material in the “dry mass”. For this reason, sample the shipping, production, stock and feed bucket humidity periodically by keeping it in a record file. Adding a few hundred kilos per truck or, on the contrary, evaporation, in months when the shipping distance is long and the rainfall rate is high, can create undetectable tonnage differences that you cannot predict where you lose when thousands of truck trips are calculated. The “humidity factor” calculation, which is far from the main topic, is an important issue that is often neglected.
Another important neglected issue is month-end or planned stockpile (dump and heaps) measurements. Remember that the quantity you get from these measurements is “volume” and there will be settlements in the waiting heaps, and there is a possibility of a dynamic bulk density.
In-situ density value (SG – Specific gravity) is a very important issue that needs to be evaluated in itself, and we covered this issue in detail in “Discrepancy between Resource Model vs Plan and Production Grade” article, which is important for both “tonnage and grade discrepancy” issues. Remember here that the specific gravity of each commodity and each ore mineral ratio will make serious differences on the tonnage operated. Even if you cannot make precise calculations, try to find a way to calculate the operating tonnage and the unit mass tonnage you will take as a weighted average by making reasonable assumptions. Whether you are aware of this issue or not, you will constantly encounter “grade and tonnage” from modeling until you produce the ore and feed it to the facility. It will be useful to get expert help for the correct method.
13. Production, Stockpiling, Feeding the Crusher / Process Plant, Ore Concentrates Sale
By examining the final product, we need to understand “what elements in grade control we should pay attention to, what data we should keep and how we should adapt it to our own system”. This title is actually a separate topic in itself, and the subject will be discussed in detail in the document we will publish regarding it. For now, with the brief explanations we will cover in this section, you can decide on the data you need to keep and the issues you need to adapt and develop to your own system. As a result, you will be able to approach your goal of trouble-free production by providing analytical control over your operation from a managerial perspective.
In underground production, you need to clarify your stocking areas, add production to these stocks and subtract supply/sales in a dynamic spreadsheet. For this, you can benefit from the “Excel” program, which is not missing on every computer of every company today. By defining standard definition input cells into sections, create
a file under your server in your computer network, where dozens of personnel can instantly log in with the table pages you have formulated. Inform all department staff about the deadlines for input on a daily, weekly and monthly basis.
It would be more useful to briefly go through an example scenario. At the end of each day, the “noon” shifts of the departments enter the data of the same day into the formulated production – feed & stockpile tracking file at 23:59.
- The production department records the point of origin, the number of trucks or tonnage in the production file,
- The mine geology department enters the grade corresponding to the materials transported in the relevant shifts,
- The process plant or sales department enters the number of feed buckets / scales or trucks sent. And process plant personnel enters the daily feed blend grade after feeding crusher.
- All performance data, visualized with analytical data and charts, statistically processed in formulas, are automatically prepared to fit on a single sheet of paper to be discussed at the daily morning management meeting.
Stock the produced ore material either underground or in intermediate stocks outside. When you assign the result to production, it will be added to the stockpiles with known total grade and tonnage. Instant current grade values should be known by dynamically taking the weighted averages of the stocks involved during this addition. You need to evaluate the block that you cut in the form of a rectangular prism, using the face, wall, “RC” and dump sampling values and block (Resource or GC) model at hand, with the geologist’s interpretation.
It may be possible to keep accounts of ore stocks at more than one stage. Since mining is done with very variable processes, setting up a file system with packages or one-off custom-made programs will make your work difficult in the future steps. In addition, in order to have this application done by a programmer, the person who will program it must have experience with orientation and understand the entire subject. For this reason, it will be beneficial to build a file system with a solid foundation and to have at least one of your staff specialized in this field, to monitor any problems that may arise in all common files, and to ensure periodic maintenance and development. Formulation application with tables and four-operations in programming languages is a very difficult and comprehension-requiring workload. The more you train your staff on “Excel”, which is one of the most formulated and programming-aided applications over tabloid/spreadsheet and cell-based formulary programs, the more time you will save.
It is possible to make your meetings more efficient by building draft files in weekly and monthly periods based on daily entries. You can pre-define data entries and printed pages created with dynamic formulas connected to the same file system and use them as drafts in meetings without wasting time. During the process, as your management demands evolve, you will ensure self-control by updating this system. Monthly manager reports are very effective records for making a note in history and for motivation. The booklets that your staff will create by filling out these reports using the same draft and standard text every month will be the most valuable works you will keep in your archive and comparison with past performance.
The processing performance of some oxidized stock materials such as Cu, Zn, Sb and ore with high oxide content can be quite low with methods such as flotation. For this reason, keeping dated stocks, recording them by making periodic measurements and protecting your stocks from weather conditions if possible, will have positive results for both process plant and concentrated ore sales performance. Controlling the process with ore processing and metallurgy laboratory examinations will also contribute to overall. It is important to quickly identify the source of the problem, otherwise you may be unnecessarily examining the reliability of the data you obtain from grade control studies.
14. Model Update Requirement and Investor Information
Ore modeling or block model making is a job that requires experience, attention and clean data, is checked with many consistency checks, and therefore takes time, sometimes taking months. We need to handle this task in two different ways: “grade control” and “resource” modelling. Our main purpose in creating the grade control model is to calculate the grade of the mass we produce through the survey measurements (3D, offset, production mapping, etc.) and the model made by intensive sampling. The resource model is where we announce the tonnage and grade of our available (remaining) resources for the purpose of informing investors and management, made by relatively sparse data and mostly estimation. For this reason, when creating a block model for both, the sampling types and statistical methods we will use for block sizes and grade estimation will differ.
Previously, grade determination using a grade control model was not a common use in underground operations due to the long time it took to build and update the model. In addition to developing programming, the improvements you make while keeping sampling records in your operation, in short, the system you configure as the mine geology department, can also enable the underground grade control model to be updated very quickly. However, by achieving significant reductions in your sample numbers, your costs can be reduced and your operation speed can be increased.
In addition to updating the resource model and increasing your resources by performing new drillhole or infill programs , you also need to calculate your resources and reserves again by removing the blocks formed by the 3D offsets of the masses operated until the specified dates. When determining these dates, you can take administrative conditions and/or your public offering periods into consideration. If you are aiming to update your resource statement in August before the last quarter, submit all grade control sampling data to the department / personnel that will update the model without error and with self-control by this date. When you share data, make a note of which model the samples will be added to, this way you will help resource geologists filter the samples to avoid using the same data in the next update. Always use “date columns” in all your sampling records, as it is always needed when “resource” word is concerned. The mine production and survey departments must submit their production offsets to be removed from the block model by the same date format. In addition, it will be useful to create a year-end model by depleting only the production at the end of the year.
Conclusions and Recommendations
The team that will manage the grade control program must be consistent and provide confidence. Have at least one reference point for every decision you make, get used to this working order and consult with your teammates based on the reference points for different subjects. When things start to get worse, it will affect all suspended elements, affecting the entire system in a chain manner. Acting with wishes and feelings will point you in all failures. Proceed based on defined systems and procedures. In this way, act with peace of mind and confidently, and demonstrate consistency and instill confidence in your other department colleagues while performing the most critical task in the mine.
Create your procedures and instructions by constantly analyzing the work steps, update them with your experiences and inform the staff. As much as possible, do not allow geologists, foremen, drillers and samplers to use initiative; define all steps and limit the workflow with options. Start clean if possible, or get help from experienced experts to review your workflow.
Provide intra-departmental and inter-departmental communication via e-mail and correspondence. Share your 3D ore body / sampling / design files, analysis results, plan comments and requests with each other and other departments through this legally recognized correspondence channel. In this way, no words will remain in the air, the work to be done will be assigned to the responsible person with a date and time stamp. In addition, you will prevent instant communication accidents that cannot be compensated in spoken language from harming people. You will be able to flow information fluently in a shift working system and when many staff work on the same subject. Get used to it, get everyone around you used to it, and it won’t take long for people to adopt it.
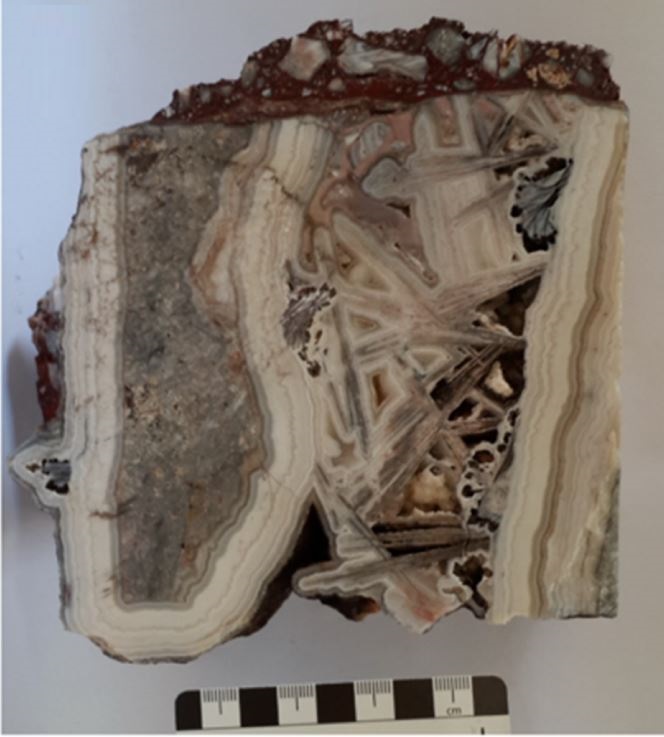
Follow the grade groups with textural and zonal continuity in the samples you make, take hand specimens from your forward samplings or stockpiles, bring them to the office and inform colleagues, geologists and samplers, and photograph and record the specimens.
As the mining geology department, you should have access to the most information about the ore. Do not deprive yourself of this opportunity, which is also important for your personal development. Follow the exploration drillholes that you will encounter or pass closely in your underground progress in your project, and compare the log data and core photographs obtained from them with what you see in the underground space. Evaluate what kind of situation you are faced with by comparing what you have obtained from 6-10 centimeter diameter cores with the real thing. In this way, you will not describe every broken ground as a fault in the drillhole logs you will do for the rest of your life, you will be able to make better drillhole plans by having a better understanding of “an ore structure”, or you can explore many more geological and geotechnical issues.
Invite and host your company’s exploration geologists underground, and if possible, complete their initial training in underground and open-pit environments. Show them your ore body model, concepts, textural determinations and help them understand how an ore deposit is formed. Seeing and understanding the ore structure from freshly cut outcrops and 3D models where it is produced are unique experiences. If possible, provide your staff with the opportunity to observe and learn through protocols with other companies. Do not expect a geologist to explore without showing him what he needs to find.
Ensure that production departments, especially occupational safety departments, learn at least basically about each other’s critical work during the orientation period. Instructing the work done by departments will ensure that the work is carried out smoothly, with the staff taking less initiative and knowing that the instructions are written somewhere on the sidelines. Instruction is a long and difficult process, but our experiences have provided positive results beyond our expectations, it is useful, try it.
The average ore grades you obtain with the weighted average based on the values in the channel samples you make during grade control studies may not be consistent with the final product. Because the process plant may directly miss a certain grade value when processing ore, and by including this grade band in the weighted average, you may increase the recommended grade slightly. Do not forget to take into account the average of the waste mixed with the ore below the minimum recovery value, and if necessary, try to bring the grade you propose closer to reality by making adjustments to your calculation formulas.
Underground grade control work requires both physical and mental competence. Fatigue and lack of concentration can make simple tasks you did not expect prone to all kinds of accidents.
Subjects discussed in this article may overlap with your mineral exploration, modeling, mining operation and business development issues and may provide solutions for those. However, remember that various factors specific to your business may bring about different challenges. Therefore, seek support from expert consultants to evaluate all data together in order to convert potential into profit most efficiently.
Should you have any questions regarding the articles or consulting services, please don’t hesitate to get in touch with us.
GMRTC Mineral Exploration & Modeling & Operation Consultancy
Istanbul - Izmir - TÜRKİYE
SITE MAP
CONTACT US
Before quoting or copying from our site, you can contact info@gmrtc.com
All elements (texts, comments, videos, images) on the GMRTC website (www.gmrtc.com) are the property of GMRTC unless otherwise stated, and are published to provide insights to interested investors, professionals, and students. Any detail that may arise during your process will affect the subject matter you are interested in on this website; therefore, GMRTC (www.gmrtc.com) is not liable for any damages incurred. It is recommended that you consult experts with all your data before making any decisions based on the information provided.